You must be signed in to read the rest of this article.
Registration on CDEWorld is free. You may also login to CDEWorld with your DentalAegis.com account.
Digital dentistry and its analytical capabilities have expanded the limits of clinicians regarding biological possibilities vis-à-vis the tissues of the human body. Digital dentistry has enhanced the clinician's ability to engage in complex interdisciplinary cases confidently and predictably while working in coordination with the patient, with a final treatment destination firmly established at the start of the treatment.1-4
Facial, radiographic, and biological tissue analyses, coupled with digital smile design (DSD) concepts,5 allow the clinician to reverse-engineer the optimal treatment plan for the patient and minimize uncertainties and unpredictability often associated with interdisciplinary cases. These "blueprints" are critical tools for communication-from start to cementation-among the treatment team, the members of which may be spread out in multiple locations throughout the world.2,4
The power of digital dentistry provides precise guidance for clinicians through a calculated endeavor to achieve the most ideal biological, structural, functional, and esthetic result possible.6 Furthermore, this result can dramatically improve a patient's confidence and quality of life.7 The following case presentation provides an example of the capabilities of digital dentistry in an interdisciplinary case.
Case Presentation
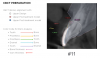
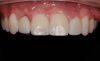
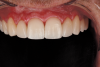
A 45-year-old male patient, who was an actor/director, presented to the authors' clinics with primarily a cosmetic concern. He was unhappy with the width of his front teeth and strongly disliked their slant as well as the display of the teeth when smiling. The four maxillary incisors had been restored with laminate veneers. After a thorough clinical examination, photographic documentation, intraoral scans, and video analysis (Figure 1), a number of initial clinical observations and treatment considerations were made.
The patient had a very symmetrical face with well-positioned and proportioned features with appropriate soft-tissue framing. However, the maxillary teeth were angulated toward the right, which was his chief complaint. It was explained to the patient that rather than limiting the treatment to complex orthodontic therapy to correct this problem, digital dentistry design protocols could be utilized for the surgical alteration of the soft tissues and bone contour in the right maxilla to create gingival harmony in the ideal facial planes. The maxillary anterior teeth could be restored with porcelain laminate veneers to create a natural and symmetrical smile. The patient was motivated by the fact that the proposed treatment would allow him to visualize the final outcome before committing to any surgical procedure. He, therefore, preferred this option over highly extensive orthodontic treatment.
Planning Phase
Cosmetically demanding interdisciplinary cases such as this one require meticulous planning from the start in order to achieve a successful outcome. The authors suggest that the following general case management principles typically apply: (1) The clinical outcome will be only as excellent as the case's record-taking. (2) Thorough planning helps establish the optimal treatment pathway customized to the patient's unique situation, with respect and consideration given to the biological condition, such as type and quality of the patient's hard and soft tissues. (3) The first two principles can be enhanced when aided by the use of digital guides to ensure a predictable esthetic and functional outcome for the patient.
Data Collection and File Formats
For the present case a substantial amount of data was collected to be submitted to the DSD planning center, including intraoral, extraoral, and 12 o'clock photographs, digital intraoral scans, retracted functional and non-retracted phonetic videos for phonetic analysis, and cone-beam computed tomography (CBCT) scans. These were sent to the DSD planning center as JPEG, MP4, STL, and digital imaging and communications in medicine (DICOM) files. To obtain high-quality clinical photographs, lighting and the positioning and angulation of the patient are paramount. Particularly when taking extraoral facial photographs in asymmetrical cases, it is essential that the patient exhibits excellent posture and equal projection and has no obstruction of the ears on both sides of the head when possible.
A unique set of critical data and information can be drawn from a video, which facilitates dynamic analyses of the smile and face that are not possible with static photography.8 Functional retracted videos and natural spoken phonetic footage hold a wealth of information that allows for the design of an ideal smile in three dimensions. This also furnishes the clinician with a more comprehensive depiction of the functional and expressive movements and limits of the face and mouth. CBCT scans are a critical part of patient records to have an accurate periodontal soft-tissue analysis in cases, such as this one, that involve crown lengthening. The lips need to be retracted away from the periodontal tissue to reduce interference when reading the thickness of the periodontal and alveolar hard and soft tissues.9 To achieve this, a useful clinical tip, as described by Gluckman and colleagues, is to insert a retraction device into the mouth that sits in the vestibular area and holds the lips away from the teeth while the CBCT scan is taken.9
Data Analysis and DSD Planning
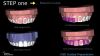
All smile parameters, including ideal tooth size, texture, proportion, and color, smile curve, gingival harmony, and the interplay of the white (tooth) versus black (embrasures) versus pink (gingiva) harmony, are taken into consideration for the DSD. Achieving natural-looking results can be aided by utilizing an abundance of natural files available in digital planning software. Although the results can still be further enhanced through additional planning, "borrowing" from nature in a "copy-and-paste" fashion can allow for a more predictable and natural-looking final esthetic outcome (Figure 2).
In this phase of DSD, simulations can be created to develop a treatment plan with the least clinical risk. Based on the initial clinical presentation compared to an idealized final result, the clinician is able to project and test possible treatment sequences and combinations. These potential outcomes can be analyzed in great detail by virtually overlaying the planned design results over the patient's hard and soft tissues. Any possible adverse outcomes and risks can be identified, and treatment adjusted accordingly. This capability significantly reduces the risk of inadequate treatment planning and incorrect diagnosis. Predictability and treatment success can be ensured before a single bur or blade touches the patient's tissues, which is one of the major benefits of digital dentistry.
Treatment Process and Protocols
Diagnostic Mock-up
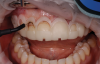
The patient presented for a mock-up appointment to demonstrate the DSD and desired outcome; a silicone index, bis-acryl material, and black oral blockout ink were used to generate the mock-up. Complex mock-up cases, such as this one, may require the creative use of visual illusions and skilled photography to provide the appearance of an ideal smile in a manner that is realistic and believable. The use of photography or videography allows patients to see the designed smile in context with their face rather than simply looking in a mirror and seeing their anticipated smile in tunnel vision. With DSD, each clinical step should be explained to the patient in a presentation format to facilitate an understanding of the procedural steps necessary to achieve an ideal result. Patients are able to give feedback and request any adjustments they may desire in a collaborative manner with the clinician, a process that can prove educational for the patient (Figure 3). The physical mock-up and presentation provide visualization for the patient as well as all of the information the patient will need to give informed consent.
This diagnostic mock-up phase also allows for assessment of the surgical plan. The proposed design, existing teeth, and gingival and bone levels are analyzed by superimposing the current file, the proposed ideal design file, and the CBCT scan. This facilitates detailed determination of the necessary gingival and bone tissue removal. In the present case, the extent of the surgical intervention was deemed feasible and approved by the patient.
Crown Lengthening and Revised DSD
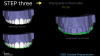
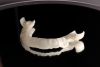
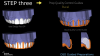
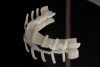
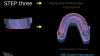
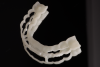
The planned crown lengthening procedure included removal of bone and gingiva on the left maxillary incisors, canine, and premolars while maintaining the existing biological width. As a result of the crown lengthening, the gingival margins were moved between 0.48 mm and 2.55 mm apically to achieve the desired leveling effect (Figure 4). The patient's biotype was quite thin, ranging between 0.49 mm and 1.14 mm, with a bone thickness of 0.73 mm to 1.18 mm. Great care was taken throughout the surgical procedure to not tear these thin tissues. A crown lengthening, or CL, surgical guide was designed and 3D-printed along with two additional copies to ensure accuracy and to serve as spares should one get damaged (Figure 5 ).
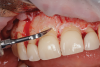
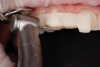
The steps of the crown lengthening procedure were as follows: First, a gingivectomy was carried out to the planned gingival levels using electrosurgery along with a curette and chlorhexidine (CHX) pellets to clean the area (Figure 6). A full-thickness gingival flap was then raised using a 15c scalpel, followed by marking the bone level to the ideal biological width with a sterile surgical pencil and the surgical guide. Next, interproximal bone sculpting was done with a round diamond bur, and the osseous margins were refined to the marked levels using an ultrasonic tip, hand instruments, and limited rotary handpieces (Figure 7). Finally, the soft-tissue flaps were adapted with polypropylene sutures and a reverse cutting needle with a vertical mattress stitch.
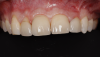
To support postoperative healing, the patient was given a 0.12% CHX mouthwash and 0.5% CHX digluconate gel with a surgical toothbrush for application. Augmentin® Duo 500 mg twice a day for 5 days (one repeat) plus naproxen 550 mg four times a day for 3 days was prescribed. The patient was followed-up in 7-day intervals, and the sutures were removed after 3 weeks. The patient was instructed to continue to massage with the CHX gel with the surgical toothbrush for 10 days (Figure 8).
A revised and refined DSD was completed 8 weeks later to confirm the final design for the veneers with the new gingival contours. A second mock-up was done before the preparation of 12 teeth (Figure 9 and Figure 10).
A full-mouth guided biofilm protocol cleaning was adhered to (using a lighter setting on the maxillary healing areas) and was completed to prepare the soft tissues and the teeth for veneer preparations. The patient was provided with a hyaluronic acid mouthwash to reduce inflammation.
Tooth Preparation
Prior to veneer preparation, the teeth were bleached with a phthalimidoperoxycaproic acid (PAP) whitening in-chair treatment. PAP is beneficial because, unlike peroxide-containing solutions, it does not release free radicals and, therefore, eliminates the otherwise necessary waiting period before bonding. Typically, with peroxide-containing solutions it is recommended to wait 8 to 11 days for color stabilization, which is less of a concern with PAP.10
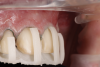
The preparations for the digitally planned veneers were guided by a series of 3D-printed preparation guides, based on the final design. The guides comprised control guides and preparation quality control guides. The tooth preparation appointment involved the following steps: (1) tooth preparation with the first incisal and buccal reduction guide (Figure 11 and Figure 12); (2) application of the technical mock-up and then preparation into the mock-up with a veneer depth-cutting bur; (3) verification of the preparation with quality control guides; (4) refinement and smoothing of the preparations; (5) assessment of the technical mock-up; (6) assessment of the incisal quality control guide (Figure 13 and Figure 14); (7) assessment of the buccal preparation quality control guide (Figure 15 and Figure 16); (8) assessment of the interproximal quality control guide (Figure 17 and 18), and verification of the preparations with the 3D-printed quality control guides in situ (Figure 19 through Figure 21); (9) slight opening of interproximal contacts with a metal finishing strip; and (10) finishing and polishing of the preparations.
The gingival contour was further refined using electrosurgery. A #00 retraction cord was placed and a retraction paste expressed into the gingival margins and left for 10 minutes. It was then washed off, and intraoral scans were taken and the files sent to the DSD planning center. Stump shade photographs were taken for accurate substrate communication with the laboratory. This allows the clinician to determine the desired shade outcome and choose the correct block translucency, thickness of preparation, and cement selection. The prepared teeth were provisionalized with bis-acryl material and the post-treatment provisional putty key, and retained with a spot-etch and spot-bond technique. A temporary retainer was also made to cover about half of the teeth and protect the provisional restorations. It would be removed for eating and drinking. The patient was also provided with hyaluronic acid gum serum and 0.5% CHX gel for use on alternate days.
Lithium-Disilicate Veneers
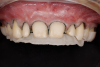
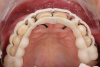
The DSD laboratory milled 12 monolithic lithium-disilicate veneers, shade BL4, based on the final design verified with the post-crown lengthening mock-up. The veneers were stained, glazed, and characterized using the "make-up" staining technique.11 The high accuracy of the milling ensured excellent marginal fit.
For final insertion, the provisional veneers were removed and gently disinfected with a cotton pellet soaked with 0.2% CHX solution. The veneers were tried in with clear try-in paste and photographed under studio lighting. Both the clinician and patient were satisfied.
The maxillary teeth were isolated with a rubber dam to ensure a controlled working environment. The veneers were etched with hydrofluoric acid for 30 seconds and rinsed, then placed in a capsule of alcohol and put in an ultrasonic bath for 4 minutes. This step is to ensure that all residual acids, crystalline precipitates, and remineralized salts are removed for optimized bonding. A silane coupling agent was applied, and the tooth surface was etched with 37% phosphoric acid for 20 seconds, rinsed, and thoroughly dried. A tooth primer was applied with a microbrush. The veneers were cemented with resin cement using a "clear" shade. Because of the ideal stump shade and conservative preparation, color masking through cement shade was unnecessary. The cement was tack-cured, and excess cement was removed with a #12 scalpel, floss, and cotton pellets. A final cure was completed under a liquid lens to ensure that all of the oxygen inhibition layer was eradicated. Static and dynamic occlusion were checked and lightly adjusted to ensure a balanced occlusion.
Nightguard Fabrication and Follow-up
An intraoral scan was taken and sent directly to the laboratory for express fabrication of a digitally designed 3D-printed nightguard. The patient was followed up 3 days later. During this appointment, the occlusal splint was delivered, and a digital occlusal analysis was performed with the patient seated upright to analyze an even occlusal force distribution. The mandibular teeth were whitened again to better match the final veneers (Figure 22 and Figure 23). Because the patient would be traveling for work for several weeks, he was issued a dental monitoring scan box to complete review scans as required to reassess the postoperative result.
Conclusion
Digital dentistry continues to empower clinicians, improving asynchronous communication across dental teams and elevating clinical outcomes for patients. Digital analyses and planning of complex interdisciplinary cases can be carried out in a highly predictable and accurate manner. 3D-printed surgical and preparation guides made from the definitive DSD are invaluable tools used to improve the accuracy and precision of clinical interventions, helping to limit human error and increase predictability. Lastly, current CAD/CAM ceramic materials paired with proper adhesive bonding protocols facilitate functional and esthetic success in the long term.
About the Authors
Fadi Yassmin, BDS, MSc Ae Dent
Private Practice in Surgical and Restorative Esthetic Dentistry, Double Bay, New South Wales, Australia
Markus B. Blatz, DMD, PhD
Professor of Restorative Dentistry, Chair, Department of Preventive and Restorative Sciences, and Assistant Dean, Digital Innovation and Professional Development, University of Pennsylvania School of Dental Medicine, Philadelphia Pennsylvania; Editor-in-Chief,Compendium of Continuing Education in Dentistry
Queries to the author regarding this course may be submitted to authorqueries@aegiscomm.com.
References
1. Joda T, Zarone F, Ferrari M. The complete digital workflow in fixed prosthodontics: a systematic review. BMC Oral Health. 2017;17(1):124.
2. Coachman C, Sesma N, Blatz MB. The complete digital workflow in interdisciplinary dentistry. Int J Esthet Dent. 2021;16(1):34-49.
3. Coachman C, Blatz MB, Bohner L, Sesma N. Dental software classification and dento-facial interdisciplinary planning platform. J Esthet Restor Dent. 2021;33(1):99-106.
4. Cofar F, Barbur I, Giordani G, et al. Multidisciplinary design: creating a common perspective in complex cases. J Esthet Restor Dent. 2022;34(1):244-251.
5. Zimmermann M, Mehl A. Virtual smile design systems: a current review. Int J Comput Dent. 2015;18(4):303-317.
6. Mykhaylyuk N, Mykhaylyuk B, Blatz MB. Digital and microscopic tools for ultimate esthetics and precision. J Esthet Restor Dent. 2022;34(1):252-258.
7. Blatz MB, Chiche G, Bahat O, et al. Evolution of aesthetic dentistry. J Dent Res. 2019;98(12):1294-1304.
8. Ackerman MB, Ackerman JL. Smile analysis and design in the digital era. J Clin Orthod. 2002;36(4):221-236.
9. Gluckman H, Pontes CC, Du Toit J, et al. Dimensions of the dentogingival tissue in the anterior maxilla. A CBCT descriptive cross-sectional study. Int J Esthet Dent. 2021;16(4):580-592.
10. Pascolutti M, de Oliveira D. A radical-free approach to teeth whitening. Dent J (Basel). 2021;9(12):148.
11. Kano P. Magic Make Up 3D [course]. Paulo Kano Education Center. https://www.paulokanoinstitute.com/magic-make-up. Accessed August 25, 2022.