You must be signed in to read the rest of this article.
Registration on CDEWorld is free. You may also login to CDEWorld with your DentalAegis.com account.
Abstract:
BACKGROUND: Conversion of a hopeless dentition to a full-arch reconstruction can be a difficult period for patients if they have to wear a denture. A serial extraction protocol can help to avoid this dilemma. RESULTS: Protocols for serial extraction of teeth are presented. This methodology avoids having patients wear a denture while converting from a hopeless dentition to a full-arch reconstruction supported by dental implants. Treatment planning with regard to placing all implants in one round of implantation vs two or more rounds of implantation is reviewed. In addition, strategies to simplify treatment regimens are discussed. CLINICAL IMPLICATIONS: The presented protocols facilitate transitioning patients from a destroyed dentition to a full-arch reconstruction. These protocols also can be used for a segment of an arch.
Extensive caries, severe periodontitis, or injury can result in loss of the dentition. Converting a patient from a condemned dentition to a rehabilitated arch may be accomplished via different treatment methods. There are four basic techniques that can be used to transition a patient from a doomed to a reconstructed arch: denture, mini-implants to support a provisional prosthesis, immediate load of inserted dental implants, or serial extraction (staged extraction of teeth and coordinated placement of dental implants).1-4 Table 1 lists advantages and limitations of these treatment strategies. This article focuses on the fourth method, referred to as serial, staged, or sequenced extraction. A treatment plan for a maxillary arch reconstruction, teeth Nos. 3 through 14, is used to illustrate a serial extraction protocol. The discussed methodology also could apply to a mandibular prosthesis. Advantageously, a serial extraction protocol accommodates a patient’s psychological need to remain dentate during partial- or full-mouth rehabilitation and can provide good esthetics and function during restoration of a dental arch.
CRITICAL STEPS IN SERIAL EXTRACTION CASES
Diagnostics
Treatment planning includes the following diagnostic procedures: a medical and dental history, intraoral examination, updated radiographs (periapical and panoramic radiographs, computed tomography [CT] scans as needed), and mounted casts for evaluation. It is recommended to have two pairs of models, one working set and another retained as an unchanged reference set. After the clinician envisions the completed prosthesis, a diagnostic wax-up can be constructed to observe the desired positions of teeth and soft tissues. The wax-up aids in designing a surgical template, which is used to direct implant placement buccolingually, mesiodistally, and apicocoronally.
Treatment Planning
With the design of the final rehabilitation in mind, the total number and location of implants needed to support the prosthesis must be determined. This decision will depend on the number of teeth to be included in the restoration, financial concerns, available bone support, maxillo-mandibular relationship, location of vital structures (eg, maxillary sinus), and the patient’s desires. In general, it is preferred to use six to eight implants to support a maxillary reconstruction of teeth Nos. 3 through 14 or Nos. 2 through 15. Use of seven or more implants in the maxillary arch allows for the prosthetic rehabilitation to be divided into three sections (eg, teeth Nos. 3 through 5; 6, 8 or 9, 11; and 12 through 14). Although this case (ie, teeth Nos. 3 through 14) was treatment planned for eight implants, it also could have been planned using six implants (eg, site Nos. 4, 6, 8, 10, 12, and 13 with cantilevers in site Nos. 3 and 14 to avoid sinus lifts if they are needed). There are many more options regarding the number of implants and sites that could have been selected for implant insertion. In this regard, the prosthesis design is dependent upon the number of placed implants, width and length of inserted implants, bone quality, and expected occlusal forces.
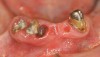
Selection of Teeth to be Extracted and to be Temporarily Retained
In the initial phase of therapy, there usually are strategic extractions performed on the day that the patient is placed into a provisional prosthesis. It is also possible that extractions will not be necessary as an initial step. Selection of teeth to be extracted will be determined by the number and locations of teeth available that could support a provisional prosthesis. Selection of four teeth to support a provisional prosthesis is best, however, three, or sometimes just two teeth may supply adequate retention for an interim prosthesis.
A previously placed implant can be used to help support an interim prosthesis or a mini-implant can be inserted for this purpose. It is advantageous if the teeth selected to retain the provisional prosthesis do not coincide with the sites that are best suited for implant placement for the final prosthesis. If this is unavoidable, the situation can be amended during the second or third round of implant placement. At that time, the tooth can be extracted and replaced with an implant. Two factors pertaining to construction of the provisional prosthesis should be considered: the number of teeth retained to support the temporary prosthesis should be limited to allow the maximum number of implants to be placed into the best available bone during one surgery; and distal abutments are preferred to cantilevers.
For a maxillary reconstruction on teeth Nos. 3 through 14, it would be advantageous to retain teeth at position Nos. 3, 6, 11, and 14 to support a provisional prosthesis. While the patterns of retained teeth that can be used for supporting a temporary prosthesis are vast, it is efficient to vacate enough sites to place all required implants during one round of implant surgery. Major issues of concern for the patient are esthetics and function of the provisional prosthesis. Other factors to consider are whether additional procedures will be required before placement of the dental implants (eg, sinus lifts, ridge augmentations with either bone or connective tissue). These actions can be performed before, at the time of, or after insertion of the interim prosthesis. From a practice management perspective, it is usually advantageous to respond to the patient’s chief complaint, which frequently is related to esthetics or loss of function. Therefore, it is advisable to fabricate the provisional prosthesis at an early stage of treatment.
Provisional Prosthesis
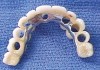
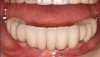
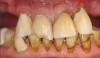
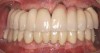
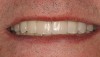
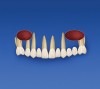
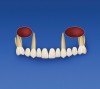
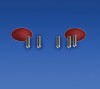
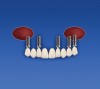
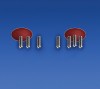
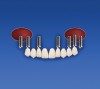
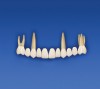
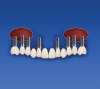
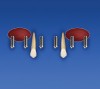
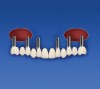
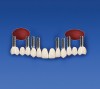
The provisional prosthesis should be cast-metal reinforced (Figure 1) to provide strength and durability, which helps avoid a major complication of serial extraction protocol: fracture of the provisional splint. The interim prosthesis needs to be strong because it will be used for an extended period of time. Furthermore, it may rest on hypermobile teeth, contain long spans of pontics, and use multiple cantilevers (Figure 2). To enhance retention of the provisional prosthesis, the abutment teeth should be long (eg, 6 mm to 7 mm), and retentive grooves can be created to provide additional resistance to displacement.
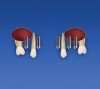
The design of the provisional splint should include retention elements as part of the cast-metal framework to enhance resin retention, and the provisional should be of sufficient bulk for increased durability. The metal framework should be positioned several millimeters coronal to edentulous areas to avoid having to reduce the framework after implants are placed. It also should be positioned to the lingual of teeth to facilitate subsequent alteration of the provisional prosthesis. In this regard, if a second round of implants is needed, the provisional prosthesis will need to be modified to allow retrofitting of the integrated implants so that they can be used to retain the prosthesis or a new provisional will need to be fabricated. The design of the cast reinforcement will depend on the span of the pontic areas, size of cantilevers, and strength of the residual supporting teeth. The provisional prosthesis can be duplicated (denture duplicator) and serve several additional purposes. For example, radiopaque markers (eg, lead foil, amalgam, barium sulfate) can be added, so it can be used as a radiographic or CT scanning template. In addition, this prosthesis can be converted to a surgical guide by inserting tubes or creating windows to direct implant placement (Figure 3). During the definitive restorative phase, it can provide the laboratory technician information pertaining to tooth length, width, arch form, and occlusal morphology.
Placement of Implants
A variety of scenarios can occur with regard to placement of the dental implants to support the final case. Implants can be submerged or not submerged, or a combination of both types of implants can be used. This decision will depend on operator preference and bone status. For example, in type IV bone, it may be preferable to submerge the implant 3 to 6 months to achieve osseointegration. Most importantly, the clinician needs to decide if the total amount of implants should be placed in one or two or more rounds of implantation.
SERIAL EXTRACTION PROTOCOL: CLASS I
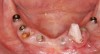
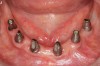
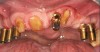
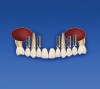
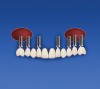
Serial Extraction Protocol: Class I (SEP C1)4 indicates that all necessary implants to support the definitive prosthesis can be placed at one time (Figure 4A through Figure 4D), which often can be arranged. For instance, teeth can be extracted and, after the sockets heal, these and other sites can be used for placement of all necessary implants. In conjunction with the previous step, if the situation is appropriate, implants also can be placed immediately into extraction sockets and guided-bone regeneration can be done as needed. Other procedures such as sinus lifts or ridge augmentations are usually performed before implant insertions if all the implants are to be placed at one time. Simultaneous placement of all needed implants precludes the need for a second round of implant placement surgery and possibly a second interim provisional prosthesis, and reduces the time necessary to bring the case to completion. At the time of implant placement, the undersurface of the interim prosthesis needs to be relieved to accommodate postoperative edema and healing abutments.
SERIAL EXTRACTION PROTOCOL: CLASS II
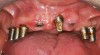
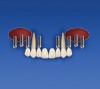
Serial Extraction Protocol: Class II (SEP C2)4 denotes that there will be more than one round of implant placement (Figure 5A through Figure 5D). When restoring a class II case, usually, after the patient is in a provisional prosthesis, procedures such as sinus lifts or ridge augmentations are performed. Then, implants are placed in two or more stages. Initially, implants are placed into edentulous ridges or immediately into sites where teeth were removed. After implant insertion, the interim provisional is placed, and implants are allowed to osseointegrate. Similar to the class I protocol, submerged and/or unsubmerged implants can be used. In addition, existing implants can be used.
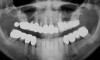
After several months, the provisional prosthesis is removed, and the remaining teeth are extracted. Additional implants are inserted into healed sockets or immediately into sites where teeth were removed, and the interim prosthesis is retrofitted to the integrated implants or a new provisional is constructed. At this stage, the provisional is supported by the integrated implants. The interim prosthesis remains in place until the second round of implants are integrated and the alveolar sockets healed. Sometimes a third round of implants is necessary. This can occur if at a desired implant site a tooth was retained to support the interim prosthesisis (eg, canines), making it impractical to remove it during the first two rounds of implantations. Then, the case is impressioned and brought to completion. An overview of stages of therapy is presented in Table 2. Three treatment scenarios for a case involving teeth Nos. 3 through 14, which is depicted in the panoramic radiograph (Figure 6) are illustrated in Figure 7A through Figure 9C.
TECHNIQUES TO CONVERT SEP C2 TO SEP C1
Conversion of an SEP C2 to an SEP C14 protocol is desirable because it can reduce treatment time and the cost of therapy. The following procedures may provide the patient with a reasonable interim prosthesis while the sockets heal and facilitate subsequent insertion of all the implants at a single visit:
- 1. Mini-implants can be used to support an interim prosthesis. Use of these implants will allow teeth to be extracted that are at sites where implants need to be placed for the final prosthesis. After sockets heal, all implants can be placed simultaneously.
- 2. If the patient can tolerate not having posterior teeth, an interim prosthesis that is short (eg, teeth Nos. 5 through 12 or Nos. 21 through 28) can be constructed, thereby allowing the posterior teeth to be extracted. Multiple cantilevers of two to three teeth can be used because there is a cast-metal reinforcement to provide enhanced strength. This facilitates extraction of posterior teeth.
- 3. Another technique involves extra-long pontic spans, which would be unacceptable in a permanent prosthesis (eg, central incisor to second molar) (Figure 2).
- 4. Teeth also can be used that are broken down. They can be used after endodontic therapy and a post is placed as an interim measure.
FINAL PROSTHESIS
The final prosthesis can be screw- or cement-retained. The number of sections used in the final reconstruction will depend on operator preference and location of the implants.
FINAL COMMENTS
Besides a serial extraction protocol, other options are available for converting a failed dentition to a restored dentition as indicated in Table 1. The intent of this article was not to discuss the merits of different techniques, but rather to present examples of serial extraction protocols as a viable methodology. The serial extraction protocols provide options for patients that they usually find desirable. With respect to full-mouth rehabilitation, it eliminates the patient’s apprehension of having to wear a denture for even a short duration of time. SEP C1 and SEP C2 also can be used for partially edentate patients. Another advantage of a serial extraction protocol is that the fixed provisional facilitates placement of nonsubmerged implants, which eliminates the need for an uncovering surgery.
The steps of treatment in Figure 8A through Figure 8F are implemented. In general, serial extraction protocols take longer than the more direct approach of extracting all the teeth and having a patient wear a denture while the sockets and the subsequent implants heal. Therefore, clinicians using a serial extraction protocol need to project that additional time will be needed to manage patients in this manner. When calculating fees for restoration of an arch, it is advisable to incorporate considerations with regard to time, repairs of provisionals, etc, into the cost of the restoration.
CONFLICT OF INTEREST
The authors declare no financial interest in the products cited herein.
REFERENCES
- 1. Waliszewski M, Janakievski J. Sequencing patients to implant-supported, full-mouth reconstructions: a case report. Pract Proced Aesthet Dent. 2005;17(4):267-272.
- 2. Mercurio RJ. Treatment planning to retain hopeless teeth as support for transitional appliances: three case reports. J Oral Implantol. 2002;28(1):15-18.
- 3. Cordaro L, Torsello F, Ercoli C, et al. Transition from failing dentition to a fixed implant-supported restoration: a staged approach. Int J Periodontics Restorative Dent. 2007;27(5):481-487.
- 4. Cavallaro J. The classification and clinical application of the serial extraction protocol for full- and partial-arch fixed prostheses. Pract Proced Aesthet Dent. 2008; 20: 377-382.
About the Authors
Gary Greenstein, DDS, MS
Department of Periodontology and Implant Dentistry, New York University College of Dentistry, New York, New York; Private Practice, Freehold, New Jersey
John Cavallaro Jr, DDS
Department of Periodontology and Implant Dentistry, New York University College of Dentistry, New York, New York; Private Practice, Brooklyn, New York
Table 1: Comparison of Treatment Techniques Transitioning to a Full-Arch Reconstruction
Technique Advantages Disadvantages Denture Less expensive, shorter treatment time Possible loss of tissue height and widthPatient needs to tolerate a denture Mini-implants No denture Increased cost Immediate load implants Reduced treatment time, no denture, Mandible more secure than maxilla because of type of bone May be lack of stability at some implant sites and reduced recession of soft tissue, Usually need cross-arch stabilization Serial extraction No denture Cost of two provisionals, longer treatment time
Table 2: Stages of Therapy
| First | Decide how many implants will be used to achieve the proposed treatment plan and if any ridge augmentation procedures or sinus lifts will be needed. Select several teeth that can support a provisional prosthesis. Extract teeth not used to support the provisional prosthesis, prepare retained teeth, reline and place an interim prosthesis. |
| Second | Perform augmentation procedures and sinus lifts, if needed. |
| Third | Place several implants at desired sites, which may include initially edentulous areas, healed extraction sites, or sites where the teeth were removed (immediate placement). |
| Fourth | After the initially placed implants have integrated, remove retained teeth. If integrated implants are not sufficient to support the definitive prosthesis, insert additional implants. These can be inserted immediately into extraction sites or after sockets have healed. Place a new provisional that rests on the integrated implants. |
| Fifth | Wait until the implants are integrated and then commence the prosthetic phase of therapy. |