You must be signed in to read the rest of this article.
Registration on CDEWorld is free. You may also login to CDEWorld with your DentalAegis.com account.
Abstract: The increasing demand for esthetic restorations has driven advancements in adhesive dentistry, with rubber dam isolation emerging as a cornerstone for achieving long-lasting and predictable outcomes. While the benefits of the use of optical magnification when utilizing rubber dam have only been briefly described in previous literature, this article’s main focus is on microscopically guided rubber dam integration (MGRI), a treatment protocol that highlights the precision of a dental operating microscope (DOM) during application of rubber dam isolation. By leveraging high magnification along with aligned illumination of the DOM, MGRI addresses challenges that clinicians commonly encounter during isolation procedures, thus enhancing accuracy, efficiency, and patient safety. The protocol emphasizes a step-by-step approach from clamp selection, clamp setting, soft-tissue coverage, and marginal inversion, to rubber dam removal, supported by four-handed dentistry for optimal execution. This minimally invasive method demonstrates how integration of the DOM can significantly elevate the standards of rubber dam application in restorative and esthetic dentistry.
Over the past several decades, the growing demand for esthetic restorations has driven the advancement of modern adhesive dentistry. Among the key components of this approach is the use of rubber dam isolation, which has been widely regarded as the standard of care due to its numerous advantages,1-5 especially concerning moisture and microbial control. In digital dentistry, rubber dam isolation provides a key benefit by establishing a clean and relatively stress-free environment that enables accurate and efficient digital scanning and deliveries of restorations. It eliminates the need for additional materials for gingival retraction or moisture control, streamlining procedures and saving time.6
The primary barriers to the routine use of rubber dam are related not to technique but rather to concerns about time, cost, and preconceived biases.7,8 However, when proper materials are selected and techniques are performed under magnification, the challenges of rubber dam application can be significantly reduced, enhancing precision and reliability in restorative dentistry.9
Many steps in the isolation protocol require visual verification. While loupes are useful, the integration of a dental operating microscope (DOM), especially in complex cases, provides exceptional illumination, technical control, and precision, enabling clinicians to work predictably and efficiently even when faced with difficult isolation scenarios.9
Proper implementation of the rubber dam plays a critical role in improving treatment outcomes.10 While various application techniques are well-documented in the literature, the accurate and secure stabilization of the rubber dam remains crucial, regardless of the method used.10-12 This article introduces the microscopically guided rubber dam integration (MGRI) technique as a minimally invasive, effective treatment protocol. Utilizing the DOM, this approach facilitates high precision, starting with the microscopic selection of the appropriate clamp shape and size, encompassing minor atraumatic marginal corrections of clamp seating, ensuring full coverage of soft tissues in areas with limited access and precise inversion and ligation for optimal stabilization and placement, and progressing to final microscopic-controlled rubber dam removal.
Clinical Steps
The clinical steps of the MGRI protocol prioritize precision and minimal invasiveness by leveraging high magnification and aligned illumination from a DOM to enhance each stage of the process. Four-handed dentistry is integral to this protocol, with the chairside assistant passing the necessary instruments to the operator to enable uninterrupted focus and visual performance. An additional assistant may also be utilized to pass equipment, which typically includes such items as a punch, forceps, clamps, latex placed on a frame, floss, a cord-packing instrument, scissors, and a marker. All the steps of the presented treatment protocol are performed under an operating microscope, utilizing a rubber dam kit and instruments. (The authors typically use the OPMI PROergo® surgical microscope [Zeiss]. Other comparable surgical microscopes include Leica M320 F12 [Leica Microsystems], A-Series™ [Global Surgical Corp.], or Flexion Series [CJ-Optik].)
Microscopic Selection and Intraoral Seating of the Clamp
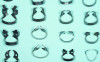
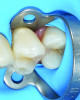
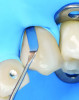
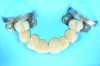
The MGRI protocol begins with the microscopic selection of the correct size and form of the appropriate clamp for securing the dental dam, as well as the subsequent placement of the clamp. Using a DOM is helpful in selecting the most suitable clamp and aids in ensuring accurate and optimal adaptation of the clamp to the tooth structure, setting the foundation for effective isolation. While no clamp kit can fully address the variety of clinical situations encountered in daily practice, it is crucial for clinicians to understand the specific function, strengths, and limitations of various clamps.9 The main parts of a dental clamp are the bracket, anchorage points or tips, and lateral wings (Figure 1).
The bracket provides most of the stiffness and contributes to the overall stability of the clamp. However, as the bracket is extended distally and away from the occlusal surface in height, its strength diminishes. Therefore, it may be necessary to activate the clamp with an appropriate instrument such as a surgical forceps prior to its placement.
The tips of the clamp should engage at least beneath the line of greatest contour, establishing a four-point contact with the tooth. For example, on a maxillary first premolar, the line of greatest contour would be located at the cervical third on the buccal surface and the middle third on the palatal surface. A wingless clamp can enhance patient comfort, provide improved access to adjacent teeth, and minimize trauma to the marginal soft tissues.
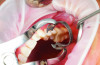
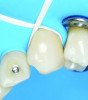
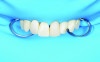
During isolation in the esthetic zone, the most distally positioned clamp helps counteract the traction exerted by the rubber dam toward the rubber dam frame. Care must be taken to avoid overstretching the clamp beyond its elastic limit, as this may lead to distortion or fracture of the clamp (Figure 2).
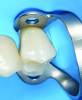
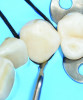
Regardless of the clamp selected, ideally it should achieve a four-point contact at the cervical region of the tooth, with the clinician ensuring that the tips of the clamp do not rest on the marginal gingival tissue surrounding the anchor tooth (Figure 3 and Figure 4).10 In the example shown, a W2 clamp, considered a premolar-specific clamp, offers an ideal size and shape in this instance, ensuring optimal stability and minimizing the risk of marginal soft-tissue injury, even during prolonged microscope-assisted procedures. Although at first glance the clamp may appear oversized, it enables a stable fit with at least four-point contact, extending securely into the distomarginal deep curvature of the tooth. This contact can be confirmed through visual validation using the DOM.
Microscopic Coverage of Tight Open Areas
and Marginal Corrections
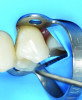
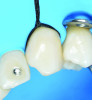
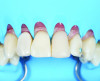
The second clinical step focuses on achieving effective and gapless isolation to ensure sustained stability. As in any isolation procedure, the rubber dam should be positioned beyond the contours of the tooth and inverted into the sulcus. The two-step rubber dam application under the DOM requires the use of four-handed dentistry to retract the cheek, thereby safeguarding the patient’s nasal and oral airways while the rubber dam sheet is stretched over the clamp.
To fully cover the interdental papillae areas, particularly behind sitting clamps, a periodontal probe can be employed to mobilize the rubber dam sheet. A heavy-gauge dam is preferred for both latex and non-latex sheets, as this provides superior retraction of peripheral tissues, including the papillae.9 While passing a thin rubber dam interproximally may seem like a straightforward endeavor, the dam is more prone to tearing when tight or less-smooth contacts are being navigated.
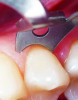
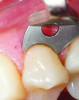
With the aid of the DOM, precise mobilization of the dental dam sheet under the clamp can be achieved, minimizing the risk of rupture and enhancing time efficiency (Figure 5 and Figure 6). The most accurate method for determining the proper spacing between perforations is by referencing the cervical area rather than the cusp tips, incisal edges, or occlusal planes, as this aids in achieving complete coverage.9
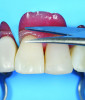
If fine corrections of marginal rubber dam beneath the clamps are required, the DOM is an indispensable tool to control any slight reopening of the clamp to obtain full cervico-approximal closure (Figure 7 and Figure 8).
Microscope-assisted Marginal Inversion Technique
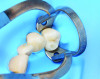
The MGRI treatment protocol progresses to achieve subgingival inversion, as this is not necessarily accomplished in the second clinical step. When the rubber dam is placed under buccopalatal tension, the clinician can identify the occlusal surface that is lacking coverage by the rubber dam and perform accurate inversion using an appropriate instrument under full visual control (Figure 9). Subgingival isolation is essential to prevent saliva and blood contamination during procedures such as veneer or onlay cementation, composite layering, or digital scanning.
Dental floss ligatures can be employed to position and invert the rubber dam cuff into the gingival sulcus (Figure 10).13,14 This can be painful to the patient, and therefore the patient should be anesthetized in the area being treated. Regardless of the isolation technique used, ligation with floss and knotting it around the tooth or teeth may be beneficial to stabilize the rubber dam in place depending on the case.15
A single-loop self-ligating tie, attached to overhand knots, is prepared outside the patient’s mouth. The loop is then placed around the cervical area of the tooth, and a flat gingival retraction cord plugger is used under the DOM to ensure the floss tie is securely positioned, even in hard-to-reach palatal areas beyond the tooth’s cervical bulge (Figure 11).16 The knot is then tightened toward the apical direction of the tooth as apical as possible by pulling the free ends apart and securing the floss around the target tooth (Figure 12). A double-loop and knot technique, which, depending on the case, may be superior to the ligature approach, is also an option. Sulcus depth, rubber dam sheet thickness, and floss diameter are three key factors that influence the sulcular positioning of the floss. These factors vary from case to case and adjustments may be needed during the course of treatment to ensure optimal placement.
Regardless of which technique is used for rubber dam marginal inversion, utilization of a DOM helps the dental team avoid marginal gingiva injuries and bleeding while enabling optimal inversion results.
Finally, the complete latex septa in the esthetic zone are firmly positioned below the contact points of the adjacent anterior teeth, effectively covering and enclosing the papillae with predictable stability and high precision (Figure 13 and Figure 14).
Microscope-guided Rubber Dam Removal
The final clinical step in the MGRI protocol involves the careful and safe removal of the rubber dam. Once the esthetic restorative or prosthetic treatment is completed, the floss ligatures securing the dam are first cut and removed. Subsequently, the rubber dam sheet is gently stretched labially or buccally to make the rubber dam accessible in the approximal zones (Figure 15). Next, using the DOM for guidance, scissors are carefully inserted behind the interdental septa of the rubber dam so that a safe cutting point in the dam can be identified between the central teeth (Figure 16). With the aid of precise microscopic observation, a careful cut of the rubber dam is made at the safe point to begin the dam removal process without the risk of harming surrounding soft tissues (Figure 17). Conventionally, the clinician or assistant would position a finger beneath the rubber dam before cutting to protect the patient’s soft tissues. However, the use of microscopic visual control eliminates the necessity of placing a finger beneath the dam, increasing the safety of the procedure for the clinician. The use of the DOM also helps ensure that no remnants of the rubber dam are left behind after its removal.
Discussion
The integration of the dental operating microscope into rubber dam application protocols, as demonstrated in the MGRI technique, addresses long-standing concerns about the complexity and time demands of traditional isolation methods. By enhancing visibility, precision, and control, DOM use enables clinicians to perform atraumatic, minimally invasive procedures with greater consistency and accuracy. This is particularly beneficial in esthetic zones, where isolation challenges can compromise restorative outcomes. Moreover, the MGRI approach simplifies soft-tissue management and clamp adaptation, reducing the need for auxiliary retraction materials.
While resistance to rubber dam usage persists due to perceived inefficiencies, this protocol illustrates that modern magnification and team-assisted workflows can be used to mitigate those barriers. Future studies comparing clinical outcomes between conventional and DOM-guided isolation methods would further validate MGRI’s effectiveness. Ultimately, by elevating the standard of care, MGRI aligns with contemporary demands for efficiency, predictability, and enhanced esthetic results in adhesive dentistry.
Conclusion
Microscopically guided rubber dam integration represents a significant advancement in adhesive and esthetic dentistry. By integrating the unparalleled precision of a dental operating microscope with rubber dam techniques, this protocol addresses both functional and esthetic challenges, facilitating high-quality treatment outcomes. The clinical steps outlined, from clamp selection to safe removal of the dam, highlight the potential of high magnification with aligned illumination of microscopes to overcome barriers such as time, cost, and stressful technical difficulty. With its focus on minimally invasive practices and sustainable stability, MGRI offers a reliable and efficient solution for achieving optimal isolation, paving the way for further innovation in modern dentistry.
ABOUT THE AUTHORS
Behnam Shakibaie, DMD, MSc
Specialist in Oral Surgery, Periodontology, Implantology, and Microscopic Dentistry, Private Clinic for Microscopic and Digital Dentistry, Tehran, Iran
Julian Conejo, DDS, MSc
Assistant Professor, Clinical Restorative Dentistry, Director, Chairside CAD/CAM Dentistry, Department of Preventive and Restorative Sciences, University of Pennsylvania, School of Dental Medicine, Philadelphia, Pennsylvania
Huthaifa Abdulqader, DDS
General Dentist, Amman, Jordan
Queries to the author regarding this course may be submitted to authorqueries@conexiant.com.
REFERENCES
1. Munaga S, Chitumalla R, Kubigiri SK, et al. Effect of saliva contamination on the shear bond strength of a new self-etch adhesive system to dentin. J Conserv Dent. 2014;17(1):31-34.
2. Wang Y, Li C, Yuan H, et al. Rubber dam isolation for restorative treatment in dental patients. Cochrane Database Syst Rev. 2016;9(9):CD009858.
3. Ammann P, Kolb A, Lussi A, Seemann R. Influence of rubber dam on objective and subjective parameters of stress during dental treatment of children and adolescents – a randomized controlled clinical pilot study. Int J Paediatr Dent. 2013;23(2):110-115.
4. Samaranayake LP, Reid J, Evans D. The efficacy of rubber dam isolation in reducing atmospheric bacterial contamination. ASDC J Dent Child. 1989;56(6):442-444.
5. Cochran M, Miller C, Sheldrake M. The efficacy of the rubber dam as a barrier to the spread of microorganisms during dental treatment. J Am Dent Assoc. 1989;119(1):141-144.
6. Henarejos-Domingo V, Clavijo V, Blasi Á, et al. Digital scanning under rubber dam: an innovative method for making definitive impressions in fixed prosthodontics. J Esthet Restor Dent. 2021;33(7):976-981.
7. Mala S, Lynch CD, Burke FM, Dummer PM. Attitudes of final year dental students to the use of rubber dam. Int Endod J. 2009;42(7):632-638.
8. Stewardson DA, McHugh ES. Patients’ attitudes to rubber dam. Int Endod J. 2002;35(10):812-819.
9. Browet S, Gerdolle D. Precision and security in restorative dentistry: the synergy of isolation and magnification. Int J Esthet Dent. 2017;12(2):172-185.
10. Patel S, Hamer S. A simple guide to using dental dam. Br Dent J. 2021;230(10):644-650.
11. Heyman HO, Swift EJ, Ritter AV. Sturdevant’s Art and Science of Operative Dentistry – A South Asian Edition. Elsevier; 2014.
12. Bhavin B, Bun SC, Patel S. Rubber dam in clinical practice. Endo (Lond Engl). 2008;2(2):131-141.
13. Baums MH, Sachs C, Kostuj T, et al. Mechanical testing of different knot types using high-performance suture material. Knee Surg Sports Traumatol Arthrosc. 2015;23(5):1351-1358.
14. Muffly TM, Boyce J, Kieweg SL, Bonham AJ. Tensile strength of a surgeon’s or a square knot. J Surg Educ. 2010;67(4):222-226.
15. Gray GB, Daud AH. A Practical Approach to Operative Dentistry. Wiley-Blackwell; 2021.
16. Alkhatib OA, Bissasu S, Daud A. Dental floss ties for rubber dam isolation: a proposed classification and a new technique. J Prosthodont. 2023;32(1):83-89.