You must be signed in to read the rest of this article.
Registration on CDEWorld is free. You may also login to CDEWorld with your DentalAegis.com account.
Introduced for dental surgeries about four decades ago, the dental operative microscope (DOM) has seen its use expanded to applications that now encompass virtually all specialties of dentistry.1,2 In endodontics and operative dentistry, for example, the use of a DOM focuses primarily on diagnosis and treatment.3-5 For prosthodontics, DOM selection varies as its usage may require a combination of specific features, including a larger field of view at the same magnification, sufficient depth of field, and lighting with an appropriate color temperature.6,7
Tooth preparation demands the highest level of accuracy, mainly because tooth tissue is nonrenewable.8 What has enabled greater preservation of this tissue is the reduced thickness now required for contemporary restorative materials, ranging from just 0.1 mm to 0.3 mm, which is beyond the resolution of the human eye.9 The direct impact of magnification and the enhanced visual capabilities of the DOM on improving the precision of tooth preparation have been highlighted in recent literature.10
The accurate reproduction of prepared tooth structures is fundamental in dental impressions and laboratory workflows. Three-dimensional surface imaging has increasingly become the preferred technique for acquiring data essential to the fabrication of fixed prosthetic restorations.11-13 By converting a prepared tooth into a virtual model, digital impressions enhance workflow efficiency, as the need for fabricating and digitizing stone replicas is eliminated.14 The digital workflow begins with tooth digitization and offers two primary approaches for restoration production using computer-aided design/computer-aided manufacturing (CAD/CAM) technology: fabrication in a dental laboratory ("labside") or directly within the dental office ("chairside").15,16
In the chairside workflow for single-unit restorations, a number of CAD/CAM systems enable the complete digital workflow to be conducted in the dental office, integrating an intraoral scanner, CAD software, and onsite milling machine.17,18 As a result, clinicians can fabricate restorations on the same day as the patient's visit,19-21 eliminating the need for multiple appointments while providing long-lasting, well-performing restorations in private practice settings.22-26 As an alternative to subtractive milling, 3D printing has emerged as a viable option for clinicians who may prefer additive manufacturing, which offers reduced material waste and cost efficiency.
Critical parameters in the decision-making process between the two workflows-labside or chairside-include scientific clinical data, costs, efficacy, and efficiency. Patient-reported outcome measures play a pivotal role in determining the optimal approach for single-tooth restorations. While the labside workflow typically includes more appointments than the chairside approach, research indicates that these additional visits do not necessarily yield more favorable outcomes from the patient's perspective.27 This insight supports the prioritization of the in-house fully digital workflow, which offers greater convenience and similar, if not superior, clinical results compared to the labside method.18
Microscopic and Digital One-Day-Dentistry Technique
The microscopic and digital one-day-dentistry technique integrates the DOM throughout every step of the chairside fully digital workflow, including tooth preparation, scanning, 3D design, milling, staining, and delivery. The underlying rationale for this one-day concept is based on the following principles:
Provides optimal accuracy:In each step of the described workflow, optical magnification factors between 6 and 22 are used in combination with minimum-sized instruments.
Eliminates multiple appointments: The technique removes the need for multiple visits when delivering a single prosthetic restoration, thus helping to prevent potential occlusal discrepancies that can arise during a prolonged provisional period.28
Enhances clinician-technician collaboration: The workflow fosters a strong collaborative relationship between the clinician and in-house technician, helping to ensure consistent quality in preparation and marginal adaptation on a case-by-case basis.
Prioritizes patient satisfaction:Patients are involved in the decision-making process, and by reducing the need for multiple appointments and enabling same-day restoration fabrication the technique is conducive to high levels of patient satisfaction.
Taking the aforementioned considerations into account, the objective of this article is to present a fully digital, single-visit technique that integrates microscopic precision into the chairside workflow protocol, facilitating both accuracy and consistency for the long-term success of single-unit prosthetic restorations.
Step-by-Step Clinical Protocol
The clinical steps of the microscopic and digital one-day-dentistry technique prioritize precision and minimal invasiveness by utilizing high magnification to enhance the accuracy of each stage in the chairside digital workflow. Four-handed dentistry is central to the protocol, with the chairside assistant supporting the procedure by passing instruments to the operator to enable seamless focus and optimal visualization, whether direct, where the surgeon views the operation field directly and can work with both hands, or indirect, where a mirror is required to see the field, sometimes limiting the surgeon to one-handed operation.
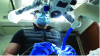
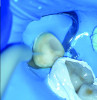
All stages of the treatment protocol in the case presented were carried out under the OPMI PROergo® surgical microscope (Zeiss). (Other comparable surgical microscopes include: Leica M320 F12, Leica Microsystems; A-Series™, Global Surgical Corp.; Flexion Series, CJ-Optik). Throughout the procedure, the clinician's arms are supported by an ergonomic dental stool armrest to allow for comfortable positioning (Figure 1).
Tooth Preparation
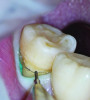
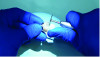
Before tooth preparation, the treatment protocol requires the microscopic evaluation of the clinical crown. In this case, the preparation margin on tooth No. 31 was microscopically identified and precisely marked with a pencil to ensure that the exact finish line of the prosthetic restoration would remain above the gingiva. Gingival retraction was then performed following the application of anticoagulation gel in the gingival sulcus to prevent bleeding from the marginal gingiva. The gingival retraction cord was packed with the clinician under the DOM.
Once the cord was packed circumferentially, an additional line was marked along the previously identified finish line to provide an accurate visual reference for the tooth preparation (Figure 2). Four-handed dentistry was utilized during preparation, with the dental assistant passing hand instruments to and minimizing hand strain on the clinician. This helps enable smooth preparation from various angles while facilitating maximum control over the magnified operating field.
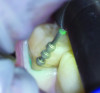
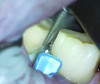
To begin the tooth preparation, depth cuts were made first on the vestibular aspect and then on the distal and occlusal areas using a depth indicator bur (Figure 3). These cuts were then marked with a pencil to ensure a minimally invasive preparation of 1 mm (Figure 4). Next, the grooves were connected around the entire tooth structure using a round-end diamond bur (Figure 5). The rounded shoulder margin was then defined on the vestibular aspect based on the previously marked finish line, extending distally while maintaining a 0.5-mm depth coronally. Under full microscopic control, the clinician carefully broke the proximal contact while a wedge-matrix combination was used to protect the adjacent tooth (Figure 6).
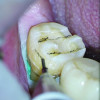
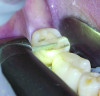
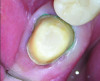
The minimal invasiveness of this preparation procedure was achieved through the 10-µm magnification provided by the DOM, which allowed for minimal yet adequate reduction to ensure sufficient occlusal space for the prosthetic restoration (Figure 7). Post-preparation microscopic evaluation is crucial to confirm the integrity of the adjacent teeth, ensuring no damage occurred during the preparation process (Figure 8).
Scanning
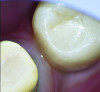
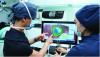
The next clinical step emphasizes the collaborative effort of the clinician and in-house technician to ensure a high-quality preparation design through digital scanning verification. In this critical process, the technician works alongside the clinician to thoroughly review every detail of the preparation zone on the digital scan while simultaneously applying necessary intraoral corrections under the DOM (Figure 9). Using an intraoral scanner, a highly precise digital impression is recorded, not only for converting the prepared tooth into a virtual model but also to facilitate teamwork within the clinic. This real-time collaboration allows the clinician to receive immediate feedback from the technician, prompting on-the-spot improvements in preparation quality.
Designing
The collaborative approach extends to the digital design of the prosthetic restoration. In this case, through clear communication between the clinician and technician, the margins were designed to be slightly longer than the restoration margins originally suggested by the scanner software. This helped to ensure full coverage of the prepared tooth and minimize the risk of open margins after cementation of the in-house milled restoration (Figure 10).
Milling
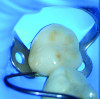
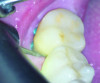
Once the design is finalized, the restoration data is digitally transmitted to the milling machine by the in-house technician. As noted earlier, 3D printing offers a flexible, cost-effective, material-efficient chairside manufacturing alternative to milling, if preferred. For this case, the restoration block was zirconia-reinforced lithium silicate, selected for its strength and esthetics. The block was loaded into the milling machine in the appropriate size and shade based on the patient's tooth shade and restoration size (Figure 11). The block gets pre-attached to a mandrel or screw mount to ensure a secure fit and prevent any movement during milling, and the manufacturing process is then carried out using either dry or wet milling. In this case, the zirconia-reinforced lithium-silicate block was attached to a screw mount and milled using a 15-minute wet milling process.
Upon completion of the milling process, the block was unscrewed using a manual hex driver and carefully examined for any fractures or chips. The restoration's margin was then smoothed around its entirety while the restoration was still attached to the block (Figure 12). The block connector was subsequently cut and polished with precision by the clinician under the DOM, preserving the restoration's margin and structure until the ideal anatomy was achieved (Figure 13 and Figure 14).
Sintering
After allowing the restoration to air-dry thoroughly, a chairside ceramic stain and glaze kit was applied to it for color adjustments and characterization, with the technician being mindful to avoid oversaturation and overglazing. The restoration was then placed on a firing tray with the occlusal surface facing upward to prevent direct contact with the tray, thus avoiding sticking. The tray was subsequently inserted into a sintering furnace; the firing cycle typically is set at 750°C to 850°C for 10 to 15 minutes.
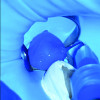
After cooling post-firing, air abrasion with aluminum-oxide particles (25 µm to 50 µm) was applied to create micromechanical retention by roughening the intaglio surface of the restoration with a circular or sweeping motion under the DOM (Figure 15). Hydrofluoric acid gel was then evenly applied to the intaglio surface, and the restoration was placed into the fixation tool (ie, a device for the transport of restorations) to minimize fracture risk during rinsing. Rinsing was carried out for at least 20 seconds to remove all acid residues, leaving a matte intaglio surface ready for silane application and final delivery.
Delivery
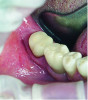
The final step of the clinical workflow involves complete isolation of the operative site using a rubber dam under the DOM to prevent contamination before cementation. After isolation was achieved the restoration was tried in to verify full seating, thus ensuring a precise marginal fit and tight proximal contacts, with smooth transitions and no overhangs (Figure 16).
Once the restoration fit was confirmed, the cementation process commenced by etching the tooth abutment with phosphoric acid while simultaneously protecting the adjacent tooth using Teflon tape (Figure 17). This was followed by rinsing and drying the abutment in accordance with the adhesive protocol (Figure 18).
Flowable dual-cure resin cement was applied to coat the intaglio surface of the restoration, with care taken to ensure minimal pooling, particularly near the margins. Light finger pressure was initially applied and gradually increased to achieve complete seating, allowing excess cement to escape. Dental tape was then passed through the proximal area, followed by an initial tack cure for 1 to 2 seconds to partially set the cement, thus stabilizing the restoration and facilitating the removal of excess cement.
Utilizing precise direct and indirect microscopic visualization, the clinician and assistant worked together to thoroughly clean the margins using an explorer. The dental tape was removed to prevent resin buildup between the interproximal contacts before the final light-curing was performed on all surfaces of the restoration for at least 20 seconds per surface using a high-power LED curing unit (Figure 19).
After removal of the rubber dam, final polishing was performed to ensure smooth margins and improve the longevity of the ceramic restoration. This step was carefully executed under the DOM with a fine-grit diamond flame bur to efficiently remove any excess cement post-cementation without damaging the restoration or tooth structure (Figure 20). The gingival retraction cords were then removed under the DOM to prevent soft-tissue trauma, with care taken to ensure that no cords were left trapped in the sulcus.
The proximal contact was checked by gently passing dental floss through the contact point without it snapping, followed by lateral movement of the teeth to avoid dislodging the restoration. Articulating paper was then used to assess static and dynamic occlusion, with any high spots adjusted microscopically to prevent over-reduction. Microscopic verification of the occlusion helps ensure that the restoration aligns with the patient's bite and functions seamlessly with the natural dentition (Figure 21 and Figure 22).
Discussion
By combining enhanced visual acuity with digital precision and same-day delivery, the microscopic and digital one-day-dentistry technique addresses many of the traditional limitations associated with both analog and early-stage digital workflows. This approach not only is aimed at optimizing clinical outcomes but also aligns with contemporary patient expectations for efficient, minimally invasive, and esthetically driven care. The magnification provided by the DOM allows clinicians to perform highly detailed tooth preparations that preserve healthy tissue while maintaining clear visibility of margins, proximal contacts, and occlusal anatomy. Furthermore, the DOM's role throughout all phases of treatment-from preparation and scanning to delivery and finishing-allows for real-time verification, correction, and refinement at each step, thus enhancing quality control and consistency.
This technique eliminates multiple appointments, which are typically associated with labside workflows. By condensing the workflow into a single visit, clinicians can reduce the risk of provisional complications such as marginal leakage, occlusal discrepancies, or patient non-compliance. Additionally, the immediacy of feedback between clinician and in-house technician fosters collaboration that can improve the marginal adaptation and esthetics of restorations on a case-by-case basis.
Nevertheless, while demonstrating considerable promise, this technique's implementation requires a high level of clinical skill, access to advanced equipment (such as a DOM and CAD/CAM systems), and a well-coordinated clinical team. The learning curve associated with operating under high magnification and adapting to fully digital systems may pose initial barriers for some practitioners. Future research should aim to quantitatively assess the long-term clinical outcomes of restorations placed using this protocol, including marginal integrity, wear resistance, and patient-reported satisfaction over time. Additionally, comparative studies evaluating cost-effectiveness and time efficiency between fully digital chairside and traditional workflows would provide valuable guidance for clinicians considering this transition.
Conclusion
This article describes the integration of the DOM into a chairside digital workflow through the microscopic and digital one-day-dentistry technique, a clinical approach aimed at enhancing the precision and consistency of single-unit prosthetic restorations. The utilization of magnification at every stage of the fully digital workflow, from tooth preparation to scanning, 3D design, milling, staining, and delivery, facilitates optimal accuracy while allowing for real-time collaboration between the clinician and in-house technician. This collaborative approach helps ensure consistent, case-to-case quality in preparation and marginal adaptation while also prioritizing patient satisfaction by reducing the need for multiple appointments and enabling same-day restoration fabrication.
Moreover, the ability to preserve occlusion and marginal fit in a single visit significantly enhances both the short-term and long-term success of single-unit prosthetic restorations. By eliminating the need for provisionalization, this approach not only improves efficiency but also reduces the risk of occlusal discrepancies that may arise during the provisional period. The combination of technological innovation, magnification, and real-time clinician feedback promises a more predictable and patient-centered approach to fixed prosthetic dental restorations.
About the Authors
Behnam Shakibaie, DMD, MSc
Specialist in Oral Surgery, Periodontology, Implantology, and Microscopic Dentistry, Private Clinic for Microscopic and Digital Dentistry, Tehran, Iran
Markus B. Blatz, DMD, PhD
Professor of Restorative Dentistry, Chair, Department of Preventive and Restorative Sciences, and Assistant Dean, Digital Innovation and Professional Development, University of Pennsylvania, School of Dental Medicine, Philadelphia, Pennsylvania
Huthaifa Abdulqader, DDS
General Dentist, Amman, Jordan
Queries to the author regarding this course may be submitted to authorqueries@conexiant.com.
References
1. Apotheker H, Jako GJ. A microscope for use in dentistry. J Microsurg.1981;3(1):7-10.
2. Koch K. The microscope. Its effect on your practice. Dent Clin North Am. 1997;41(3):619-626.
3. Selden HS. The dental-operating microscope and its slow acceptance. J Endod.2002;28(3):206-207.
4. Sitbon Y, Attathom T, St-Georges AJ. Minimal intervention dentistry II: part 1. Contribution of the operating microscope to dentistry. Br Dent J. 2014;216(3):125-130.
5. Sitbon Y, Attathom T. Minimal intervention dentistry II: part 6. Microscope and microsurgical techniques in periodontics. Br Dent J. 2014;216(9):503-509.
6. Nase JB. The clinical operating microscope advantage in fixed prosthodontics. Gen Dent. 2003;51(5):417-422.
7. Shakibaie B. Uses of the operating microscope in minimally invasive implantology. Quintessenz. 2010;61:293-308.
8. Akkus A, Karasik D, Roperto R. Correlation between micro-hardness and mineral content in healthy human enamel. J Clin Exp Dent.2017;9(4):e569-e573.
9. da Cunha LF, Pedroche LO, Gonzaga CC, Furuse AY. Esthetic, occlusal, and periodontal rehabilitation of anterior teeth with minimum thickness porcelain laminate veneers. J Prosthet Dent.2014;112(6):1315-1318.
10. Eichenberger M, Biner N, Amato M, et al. Effect of magnification on the precision of tooth preparation in dentistry. Oper Dent.2018;43(5):501-507.
11. Beuer F, Schweiger J, Edelhoff D. Digital dentistry: an overview of recent developments for CAD/CAM generated restorations. Br Dent J.2008;204(9):505-511.
12. Davidowitz G, Kotick PG. The use of CAD/CAM in dentistry. Dent Clin North Am. 2011;55(3):559-570.
13. van Noort R. The future of dental devices is digital. Dent Mater.2012;28(1):3-12.
14. Persson AS, Oden A, Andersson M, Sandborgh-Englund G. Digitization of simulated clinical dental impressions: virtual three-dimensional analysis of exactness. Dent Mater.2009;25(7):929-936.
15. Sannino G, Germano F, Arcuri L, et al. CEREC CAD/CAM chairside system. Oral Implantol (Rome). 2015;7(3):57-70.
16. Ender A. CEREC Basic Information 4.0 A Clinical Guide. Sirona Dental Systems GmbH in cooperation with the University of Zurich; 2011. http://www.medtronik.ru/upload_files/file/CEREC_Basic_Information_4.0.pdf. Accessed April 14, 2025.
17. Mörmann WH. The evolution of the CEREC system. J Am Dent Assoc.2006;137 suppl:7S-13S.
18. Fasbinder DJ. The CEREC system: 25 years of chairside CAD/CAM dentistry. J Am Dent Assoc.2010;141 suppl 2:3S-4S.
19. Mörmann WH, Brandestini M, Lutz F. The Cerec system: computer-assisted preparation of direct ceramic inlays in 1 setting [in German]. Quintessenz. 1987;38(3):457-470.
20. Neves FD, Prado CJ, Prudente MS, et al. Micro-computed tomography evaluation of marginal fit of lithium disilicate crowns fabricated by using chairside CAD/CAM systems or the heat-pressing technique. J Prosthet Dent. 2014;112(5):1134-1140.
21. Shakibaie B, Blatz MB, Conejo J, Abdulqader H. From minimally invasive tooth extraction to final chairside fabricated restoration: a microscopically and digitally driven full workflow for single-implant treatment. Compend Contin Educ Dent. 2023;44(10):582-588.
22. Otto T, Mörmann WH. Clinical performance of chairside CAD/CAM feldspathic ceramic posterior shoulder crowns and endocrowns up to 12 years. Int J Comput Dent. 2015;18(2):147-161.
23. Otto T, Schneider D. Long-term clinical results of chairside Cerec CAD/CAM inlays and onlays: a case series. Int J Prosthodont.2008;21(1):53-59.
24. Reich S, Schierz O. Chair-side generated posterior lithium disilicate crowns after 4 years. Clin Oral Investig. 2013;17(7):1765-1772.
25. Rauch A, Reich S, Dalchau L, Schierz O. Clinical survival of chair-side generated monolithic lithium disilicate crowns: 10-year results. Clin Oral Investig. 2018;22(4):1763-1769.
26. Bindl A, Richter B, Mormann WH. Survival of ceramic computer-aided design/manufacturing crowns bonded to preparations with reduced macroretention geometry. Int J Prosthodont. 2005;18(3):219-224.
27. Zuercher AN, Ioannidis A, Hüsler J, et al. Randomized controlled pilot study assessing efficacy, efficiency, and patient-reported outcomes measures of chairside and labside single-tooth restorations. J Esthet Restor Dent. 2023;35(1):74-83.
28. DiTolla M, Adams D. Single-visit dentistry is here... are you ready? Dent Today. 2016;35(2):76-79.