You must be signed in to read the rest of this article.
Registration on CDEWorld is free. You may also login to CDEWorld with your DentalAegis.com account.
The use of dental implants to stabilize a loose maxillary or mandibular denture is widely considered a predictable, effective, and safe treatment modality.1-3 Treatment of edentulous patients with traditional analog methods by fabricating a tissue-supported complete denture is fraught with a myriad of clinical challenges that can be a frustrating experience. Challenges for the clinician include excessive shrinkage of denture base materials, causing sore spots; fabrication with ideal border molded impression techniques; and reliance on waxes and denture teeth that need to be physically modified and adapted to each clinical case. Other challenges with traditional denture fabrication methods may include an increased number of visits to the dental office, a greater number of sore spots after prosthesis placement, increased patient complaints, and less "permanent feeling" of the restoration.4
Although the rate of edentulism has been declining steadily since the 1970s, the population aged 65 years and older continues to grow, and individuals in that age range have a disproportionately higher level of edentulism than younger patients.5 Edentulism rates have been decreasing due to increased dental awareness, expanded dental plan coverage for basic and preventative services, and expanded dental procedures, including dental implants. However, enhanced awareness of overall healthcare, proper diet and nutrition, and a greater role of medical care in daily lives has helped to extend the longevity of individuals throughout the country. As a result of the growth of the elderly population, an estimated 60 to 61 million completely edentulous arches currently require dental intervention, and demand for dental treatment is likely to increase. Although edentulism is widely considered a treatable oral disease state, historically one of the greatest challenges facing the clinician is providing a removable prosthesis with adequate retention and stability.6-8
This article will describe the background, philosophy, and methodology of implant denture fabrication. Emphasis will be placed on evaluating newer attachment systems and comparing digital denture systems to the traditional analog methods long employed by technicians and clinicians.
Attachment System Options for Overdentures
Edentulous ridges have tremendous variability in anatomical configuration, ranging from straight and rounded to irregular and sharp. Anatomical features of the maxillary or mandibular bone may complicate surgical and prosthetic outcomes for patients, and few ideal implant sites for overdentures exist.9 Angulation challenges are especially evident in maxillary overdenture cases that have more than two implants because increased angulation may result in greater difficulty in inserting and removing the prosthesis. The older population that tends to benefit most from implant stabilization of dentures can also be a challenge to treat in compromised cases because those patients tend to have decreased mobility and weaker arm and hand strength, which can compound difficulties in inserting and removing prosthetics properly.
The placement of dental implants for stabilizing dentures has been long regarded as a safe and highly effective long-term treatment.1-3 Factors related to successful treatment with overdentures include implant number, location, distribution, and choice of abutment.10-11 Although other methods and abutment systems can be effective, such as a Hader bar, ball/cap, or O-ring, clinicians can simply, reliably, and predictably fabricate implant-retained overdentures using stud-style abutments, such as LOCATOR® (Zest Dental Solutions, zestdent.com) or OD Secure™ (Biohorizons, biohorizons.com). Many professionals advocate using two to four stud-style abutments to provide optimal retention, stability, and comfort of the prosthesis while minimizing prosthesis size, long-term maintenance, and cost compared with other systems.12Additionally, some advocate that overdenture design should emphasize simplicity to ensure patients can adequately insert and remove their prosthesis.13 Traditional stud-style abutments have long been employed by clinicians in various clinical situations, ranging from individual free-standing implants up to splinted bar overdenture designs.
Contemporary design of stud-style abutment systems for overdentures helps with accommodation of patients with challenging anatomical or dexterity presentations. These newer abutment systems, such as the LOCATOR R-Tx Removable Attachment System (Zest Dental Solutions), permit increased angulation up to 30o per implant, or up to 60o total divergence between multiple implants.14 Additionally, the newer designs permit dual-retention through a novel method of external retention mechanisms combined with a carbon-titanium-nitride surface, minimizing food impaction, plaque accumulation, and wear of the attachments, and ultimately simplifying insertion and removal of the prosthesis. Compared with the original LOCATOR design, the contemporary LOCATOR R-Tx system offers advantages including a narrower abutment for simpler insertion and removal, a standard 1.25 mm/0.050" hex drive insertion mechanism, dual retention on the exterior surface, and pink color to the abutment and denture housing. The increased divergence permits abutment use even with challenging anatomical limitations that preclude parallel implant placement, such as the maxillary arch. Similar to the original LOCATOR system, the R-Tx system permits multiple levels of retention options while the patient is becoming acclimated to the new implant-retained denture.
Digital vs Analog Methods of Denture Fabrication
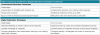
Although traditional methods of denture fabrication are effective and have been employed for years, they can be cumbersome to the patient, especially with the older patients who benefit most from implant denture therapy. Between four and ten appointments are required for fabricating an implant denture using traditional methods, including initial appointments, surgical placement of implants, and prosthetic procedures for the definitive prosthesis. The conventional process includes using physical impression materials such as irreversible hydrocolloid, polyvinyl siloxane (PVS), and various border molding materials to generate a physical impression. Additionally, the clinician often requires 7 to 14 days between appointments to ship the impressions and dental casts to the laboratory for fabrication of custom trays, occlusal wax rims, and denture tooth prototypes. Although it can vary between clinicians, the average clinical time required may often exceed 125 to 205 minutes, or 2 to 3 hours for these conventional/analog workflows, and laboratory fees may run between $200 and $500. Compared with analog methods of fabrication, digital denture production may result in a prosthetically similar or even potentially superior prosthesis.15Additionally, digital fabrication methods for implant denture prosthetics have resulted in reduced laboratory and clinical costs, less frequent appointments required, and a lower overall burden on older, edentulous patients (Table 1 and Table 2).16
CAD/CAM permits production of teeth and tissues from premanufactured teeth, resins, and other polymers. Optical scanning technology, such as intraoral scanning, is used to generate a virtual replica of the patient's dentition and oral tissues. After generation of the optical images, conversion from a proprietary image format into a readily used, open-architecture format, such as a stereolithography (STL) file, is achieved. These images are imported into either a commercially available dental-specific or freely available open-architecture software package for processing of the images. In the dental design software, a wizard-like function permits a fastidious design using built-in commercially available manufacturing methods specific to dentistry. After generation of the designed restoration, files are sent to the manufacturing method of choice for production of the prosthetics.
Two types of methods are used in production of digitally designed restorations: subtractive and additive manufacturing. Subtractive manufacturing, often referenced as "milling," produces a restoration by cutting a shape out of a disc or block of already manufactured material, such as zirconia, polymethyl methacrylate (PMMA), metals, or waxes.17 Milling has historically been used in clinical and laboratory practice because it permits an accurate and precise restoration that is readily produced with materials that are appropriate for long-term use.18Disadvantages of milling include longer production times, costs, excessive waste in production, and long-term maintenance of milling machines. Additive manufacturing, also known as "3D printing," has gained a tremendous amount of momentum in dentistry because it permits an accurate and rapid production of prosthetics, surgical guides, and dental casts with substantially less waste.19 Disadvantages of 3D printing include limited knowledge about long-term strength of materials, complexity of manufacturing, and biocompatibility.20At the time of this publication, little was known about the long-term flexural and shear strength of 3D-printed materials. Emerging evidence, however, indicated that 3D-printed denture base and tooth resins were comparable to traditional PMMA or bis-acryl materials.21Although some professionals advocate that milling tends to produce a stronger and more durable prosthesis, additional studies are needed to compare the two manufacturing processes to provide reliable clinical recommendations. Both manufacturing methods can produce restorations and prosthetics used in dentistry, but both present unique challenges because manufacturing methods are continuing to evolve. Clinician and technicians often feel the need to choose only one technology and adapt their methodology to it; however, both manufacturing methods can be combined to generate a restoration that can provide a result that can overcome some of each other's manufacturing challenges.
Case 1: 3D-Printed Mandibular Implant Overdenture
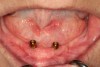
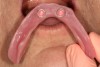
A 50-year-old female patient with existing mandibular implants presented with a chief concern that she dropped her implant denture and caused it to fracture in the approximate area of the denture housing corresponding to the implant in the mandibular left canine. Her denture was removed, and the abutments were inspected to ensure they were intact and the tissues appeared healthy (Figure 1). The existing prosthesis was temporarily repaired using PMMA autopolymerizing acrylic resin, ensuring the patient's occlusion and vertical dimension were not altered (Figure 2). The patient was given options, including a denture rebase or reline; however, she indicated that she had limited ability to return to the dental office because she was unable to drive and physically unable to return the following day because she had a family emergency and needed to travel with family. The author's office advised her that a simple repair would last for a few days but would not last for an extended time. The patient further indicated that she would be unable to return for several months because of the family emergency, so the option was discussed of having a replacement 3D-printed denture fabricated, which could be produced in approximately 2 hours. She agreed to the 3D-printed denture option and was thankful that the author's office could provide that service.
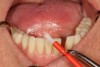
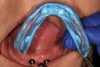
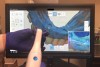
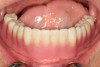
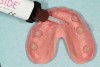
The existing LOCATOR abutment housings were removed from the denture and new housings were placed onto each abutment. Recesses were prepared using a denture preparation bur system, and passive fit of the prosthesis over the housings was confirmed before any impressions were made. Universal PVS adhesive was applied to the intaglio of the denture. A closed-mouth reline was made using monophase PVS, ensuring proper borders and occlusion were verified through border molding procedures and having the patient close into centric while the denture was in the mouth (Figure 3). After complete polymerization, the prosthesis was removed and inspected. The relined prosthesis was scanned starting with the tissue surface, using an intraoral scanner. Because a copy of the patient's existing prosthesis was being made, a full 360o scan was completed, capturing the relined tissue surface as well as the teeth/cameo surface of the denture (Figure 4). The patient's opposing dentition was scanned intraorally, the denture housings were removed from the top of the abutments, the prosthesis was placed back onto the edentulous ridge, and the patient was instructed to close into a centric position. The patient's interocclusal record on each side was made using the intraoral scanner and inspected, verifying proper occlusion of the virtual denture to the patient's opposing arch. The patient was dismissed and advised to return 2 hours later for definitive prosthetic procedures.
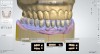
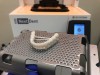
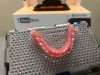
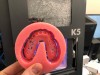
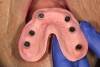
The scans were exported from the intraoral scanner and imported into a commercially available dental laboratory software for designing digital dentures. The scans were manipulated using the wizard step-by-step functionality of the software, including denture tooth placement, digital design of the tissue-bearing surface, and ensuring proper relief was provided around the overdenture denture housings (Figure 5). The final denture design was split into two 3D-printable STL files, one of the arch of the teeth and the second of the denture base. Each STL file was imported into a 3D-printing software, and virtual support pins were placed onto each file and uploaded to two separate 3D printers. The tooth arch was printed in a tooth-colored resin that matched the shade of the patient's existing denture teeth, and the denture base was printed in a pink-colored resin that matched the shade of the patient's existing denture base (Figure 6 and Figure 7). The printed prosthetic parts were removed, cleaned using a series of alcohol baths, and light-cured using a curing box. Stain and glaze were applied to the denture tooth arch to bring the esthetics close to the patient's existing denture. The arch of the teeth was luted to the pink base using the existing pink denture base resin and light-cured. The prosthesis was polished using a rag wheel and pumice. All prosthetic and design procedures were completed within 90 minutes; the patient was instructed to return 2 hours after her appointment to provide flexibility in case additional time was needed for characterization or polishing procedures.
The patient returned for definitive prosthetic procedures; block-out spacers and denture housings were applied onto each abutment. The 3D-printed prosthesis was placed onto the edentulous ridge, and disclosing medium was used to ensure complete adaptation of the prosthesis. Recesses were prepared using a specialized denture preparation bur system, and passive fit of the prosthesis over the housings was confirmed. Composite resin material was placed into each recess and the denture seated onto the edentulous ridge, confirming complete adaptation and holding the prosthesis lightly (Figure 8). After complete polymerization, the prosthesis was removed, ensuring adequate processing of housings to the denture. Processing inserts were removed, and definitive nylon inserts were placed into each housing, matching the retention level of the patient's existing prosthesis (Figure 9). The prosthesis was inserted, confirming complete adaptation, stability of the prosthesis, centric, esthetics, and that the patient could insert and remove the prosthesis successfully (Figure 10). The patient was satisfied and indicated that she was thrilled at what could be accomplished in just 2 hours. She returned several months later indicating that she was satisfied with her prosthesis, reported no adjustments needed, and is very comfortable.
Case 2: Milled Maxillary Implant Overdenture
A 65-year-old male patient presented with an interim maxillary denture and existing maxillary implants placed approximately 3 months earlier, requesting a definitive maxillary denture with an open palate. The patient also requested minimizing the number of appointments because it was difficult for him to come to numerous appointments. The author's office advised him that a definitive milled denture could be fabricated in two visits; the patient agreed and decided to proceed with a two-visit milled implant denture.
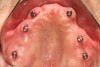
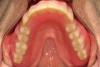
Healing abutments were removed, and measurements of the soft-tissue height were made. Each implant was irrigated with a 2% chlorhexidine scrub, and LOCATOR R-Tx abutments were placed onto each implant; radiographs were made confirming complete adaptation of the abutments, and each was torqued according to manufacturer-recommended torque values (Figure 11 and Figure 12).
Denture attachment housings were placed onto each abutment and a digital scan was made with an intraoral scanner of the maxillary arch with the housings in place (Figure 13). A scan was made of the opposing dentition, and a scan of the occlusion was made using a PVS reline of the patient's existing interim denture and anatomical reference markers corresponding to positions between the existing interim denture and the scan of the maxillary arch with housings in place. The denture attachment housings were removed from each implant, and the interim denture was relined with a soft reline material.
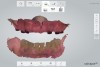
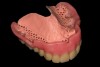
The scans were exported from the intraoral scanner and imported into dental laboratory software for designing digital dentures. The scans were manipulated, and an open-palate frame was fabricated, providing space around each of the implants and housings. After completion of the framework design, denture tooth placement and the denture base were designed. Emphasis was placed on designing an open-palate prosthesis and using commercially available denture teeth for integration within the digital design (Figure 14). Using the wizard step-by-step functionality of the software, two STL files were prepared: 1) a framework design and 2) a tissue-bearing denture base file with pockets cut out for placement of denture teeth and fitting intimately with the digital design of the open-palate framework. Each STL file was imported into a dental laboratory milling unit, the framework was milled in a fiber-reinforced hybrid material, and the denture base was milled using a premanufactured PMMA disc (Figure 15 and Figure 16). The milled polymer framework was air-abraded using a sandblaster and luted to the milled PMMA tissue surface using a composite resin. Individual denture teeth were luted to the milled tissue surface using autopolymerizing PMMA acrylic resin. A 3D-printed positioning template was used to assist in denture tooth luting procedures because it holds each individual denture tooth in position, assisting with luting procedures and to minimize movement of the denture teeth (Figure 17). The prosthesis was polished using a rag wheel and pumice.
When the patient returned, block-out spacers and denture housings were placed onto each abutment. The milled prosthesis was placed onto the edentulous ridge and complete adaptation confirmed with the assistance of disclosing media. Recesses were prepared using a specialized bur system, and passive fit of the prosthesis over the housings was confirmed. Composite resin material was placed into each prepared recess, and the denture was seated onto the edentulous ridge (Figure 18). After complete polymerization, the prosthesis was carefully removed while ensuring each housing was successfully attached to the prosthesis (Figure 19). Additional composite resin was place around each of the housings, and the prosthesis was polished.
Definitive nylon inserts were placed into each housing, starting with light nylon inserts on each implant. The prosthesis was inserted, confirming complete adaptation, stability of the prosthesis, centric, and esthetics (Figure 20). The patient attempted to demonstrate removing the prosthesis; however, with six light inserts in place, the retention was excessive and the patient could not easily remove the prosthesis. The prosthesis was removed, zero-retention inserts were placed in the middle two housings, and light inserts were kept in the most anterior and posterior housings. The patient successfully demonstrated inserting and removing the prosthesis.
The patient returned one week after the delivery appointment indicating that he was extremely satisfied with the prosthesis. He further indicated that he requested replacement of the middle two housings and requested the same inserts as the other implants. The existing zero-retention nylon inserts were replaced with light-retention nylon inserts, and the patient was satisfied with the final result.
Conclusion
Although analog methods for implant denture fabrication can produce a satisfactory prosthesis, these traditional methods often require multiple visits and have a higher associated cost. Contemporary digital methods of prosthetic fabrication can produce a denture that meets or exceeds traditional analog standards, with fewer visits and reduced cost.
ABOUT THE AUTHOR
Michael D. Scherer, DMD, MS,is an assistant clinical professor at Loma Linda University and maintains a practice limited to prosthodontics and implant dentistry in Sonora, California. He is a fellow of the American College of Prosthodontists and has published articles, DVD training series, and in-person and online courses related to implant dentistry, clinical prosthodontics, and digital technology, with a special emphasis on full-arch reconstruction. Dr. Scherer maintains formal online courses at FastTrackDentalCE.com and five YouTube channels: LearnLOCATOR, LearnLODI, LearnSATURNO, LearnLOCATOR F-Tx, and The 3D Dentist.
References
1. Naert I, Alsaadi G, Quirynen M. Prosthetic aspects and patient satisfaction with two implant-retained mandibular overdentures: a 10-year randomized clinical study. Int J Prosthodont. 2004;17(4):401-410.
2. Sadowsky SJ. Mandibular implant-retained overdentures: a literature review. J Prosthet Dent. 2001;86(5):468-473.
3. Scherer MD. Overdenture implants. A simplified and contemporary approach to planning and placement. Dent Today. 2015;34(8):54-60.
4. Leles CR, Ferreira NP, Vieira AH, et al. Factors influencing edentulous patients' preferences for prosthodontic treatment. J Oral Rehabil. 2011;38(5):333-339.
5. Douglass CW, Shih A, Ostry L. Will there be a need for complete dentures in the United States in 2020? J Prosthet Dent. 2002;87(1):5-8.
6. Rozier RG, White BA, Slade GD. Trends in oral diseases in the U.S. population. J Dent Educ. 2017;81(8):eS97-eS109.
7. Carlsson GE, Otterland A, Wennström A, Odont D. Patient factors in appreciation of complete dentures. J Prosthet Dent. 1967;17(4):322-328.
8. Assunção WG, Barão VA, Delben JA, et al. A comparison of patient satisfaction between treatment with conventional complete dentures and overdentures in the elderly: a literature review. Gerodontology. 2010;27(2):154-162.
9. Scherer MD. Presurgical implant-site assessment and restoratively driven digital planning. Dent Clin North Am. 2014;58(3):561-595.
10. Scherer MD, McGlumphy EA, Seghi RR, Campagni WV. Comparison of retention and stability of implant-retained overdentures based upon implant number and distribution. Int J Oral Maxillofac Implants. 2013;28(6):1619-1628.
11. Scherer MD, McGlumphy EA, Seghi RR, Campagni WV. Comparison of retention and stability of 2 implant-retained overdentures based on implant location. J Prosthet Dent. 2014;112(3):515-521.
12. Roccuzzo M, Bonino F, Gaudioso L, et al. What is the optimal number of implants for removable reconstructions? A systematic review on implant-supported overdentures. Clin Oral Implants Res. 2012;23(suppl 6):229-237.
13. Burns DR, Unger JW, Coffey JP, et al. Randomized, prospective, clinical evaluation of prosthodontic modalities for mandibular implant overdenture treatment. J Prosthet Dent. 2011;106(1):12-22.
14. Scherer MD. Simplifying implant overdentures: contemporary overdenture abutment and attachment systems. Dent Today. 2016;35(2):92-97.
15. Drago C, Borgert AJ. Comparison of nonscheduled, postinsertion adjustment visits for complete dentures fabricated with conventional and CAD-CAM protocols: a clinical study. J Prosthet Dent. 2019; pii: S0022-3913(18)31165-X. doi: 10.1016/j.prosdent.2018.10.030.
16. Srinivasan M, Schimmel M, Naharro M, et al. CAD/CAM milled removable complete dentures: time and cost estimation study. J Dent. 2019;80:75-79.
17. Lebon N, Tapie L, Duret F, Attal JP. Understanding dental CAD/CAM for restorations--dental milling machines from a mechanical engineering viewpoint. Part B: labside milling machines. Int J Comput Dent. 2016;19(2):115-134.
18. Papadiochou S, Pissiotis AL. Marginal adaptation and CAD-CAM technology: a systematic review of restorative material and fabrication techniques. J Prosthet Dent. 2018;119(4):545-551.
19. Dawood A, Marti Marti B, Sauret-Jackson V, Darwood A. 3D printing in dentistry. Br Dent J. 2015;219(11):521-529.
20. Tack P, Victor J, Gemmel P, Annemans L. 3D-printing techniques in a medical setting: a systematic literature review. Biomed Eng Online. 2016;15(1):115.
21. Prpic V, Slacanin I, Schauperl Z, et al. A study of the flexural strength and surface hardness of different materials and technologies for occlusal device fabrication. J Prosthet Dent. 2019;121(6):955-959.