You must be signed in to read the rest of this article.
Registration on CDEWorld is free. You may also login to CDEWorld with your DentalAegis.com account.
With dental implants having a very high success rate, whether placed using an immediate or delayed protocol in a wide range of clinical situations in the oral cavity, it is understandable that they have been used extensively to replace guarded and hopeless teeth.1 Also supporting their usage is their resistance to dental caries and their ability to withstand the forces of occlusion in a properly designed dental reconstruction or single-tooth implant restoration. However, a passionately debated question remains: When to save or remove an ailing implant?
One of the key issues with dental implants is that they can be associated with peri-implantitis and attachment loss much like teeth can be affected by periodontitis. One reason for the resurgence of this dental dilemma not previously seen with machined implants has to do with the microsurface texture of present-day implant systems. This texture can vary greatly, with the roughness being specific to each of the various product manufacturers. Different types of etching, blasting, and coatings have proven either more or less susceptible to bone loss over the years.
This topic has recently gained greater significance in the dental community since the intraoral survival of implants has increased, and a certain percentage of implants will start to exhibit attachment loss. Even if this percentage is relatively small (eg, 5% to 10%) over time, it still represents a vast number of affected implants. In addition, a higher amount of implants are being placed annually. Consequently, clinicians must now spend more time repairing the bone loss associated with these implants.2,3
There are several techniques that have been reported on how to treat peri-implantitis, just as there are with periodontal disease and teeth.4 However, because of the lack of consistency in the treatment outcomes of peri-implantitis, along with new technologies and devices that allow for minimally invasive implant removal via high-reverse torque instead of trephining, these devices may now incline the clinician more toward removal versus surgical remediation.
Another important consideration is the esthetic outcomes of implants that are placed. Proper spatial placement is a key factor in achieving a successful esthetic implant restoration.5-7 Periodontal, orthodontic, and restorative “gymnastics” is frequently required in complex situations in an effort to make corrections, often with limited results.8-16 When placement is highly compromised, implant removal should be considered as a tangible treatment option.
Lastly, patients may sometimes be resistant to having implants removed, either due to emotional or financial reasons. The time involved, including the number and length of treatment procedures, can be emotionally draining, while the cost of treatment can be overwhelming. Patients often become distressed when faced with having to pay at least twice for retreatment.
The pros and cons of saving or removing an ailing implant are complex, analogous to when to save or remove a tooth. Therefore, the clinician—with the consent of the patient—must judge each implant case individually. Because questions still remain regarding consistency in treatment and resolution of lesions around implants affected with peri-implantitis, the clinician must decide whether it is more prudent to save the implant or remove and replace it, either immediately or delayed.
Therefore, the purpose of this article is to give clinicians a clear direction in the decision-making process when presented with an ailing implant. The final decision for how to treat an ailing implant may involve a combination of several of the aforementioned factors. Giving consideration to these many factors will lead to the clinician to determining the best treatment choice based upon the clinical situation at presentation.
Decision-Making Process
The variables that are involved in the decision-making process of when to save or remove an implant are delineated below, followed by associated clinical examples of each case type highlighting these factors.
Saving an Implant
An implant can be saved in the following scenarios:
1. The fixed dental prosthesis supported by the implant does not require replacement unless the implant is removed and esthetics is not a factor in treatment.
2. Adequate access for peri-implantitis treatment is available.
3. The implant is causing an esthetic problem that can be predictably treated by surgical and/or prosthetic means.
This would include excessive labial implant angulation or spatial placement with either inadequate implant depth or intermediate-to-thick periodontal phenotype.
4. Removal cannot be performed by a reverse-torque device (and must otherwise be surgically removed via drill or trephine). This can be the case when:
• the connection of the implant is fractured and sheared off and cannot be engaged with the reverse-torque device
• the interradicular implant–tooth distance is limited such as with the lower anterior dentition
• the implant has more than adequate length and cannot be easily removed with reverse torque
5. The patient has psychological or emotional attachment to the implant.
6. Financial considerations are an issue.
Removing an Implant Removing the implant may be the proper decision when the following factors are involved: The fixed dental prosthesis supported by the ailing implant requires replacement. The implant is causing an esthetic problem that cannot be predictably treated by surgical or prosthetic means. This would include: excessive labial implant angulation or spatial placement causing midfacial gingival recession inadequate implant depth thin periodontal phenotype
3. There is existing attachment loss in combination with poor position. This would mean that hard- and soft-tissue grafting would have to be successful to achieve a proper outcome. The success would depend on being able to remove the endotoxins from the implant surface.
4. The implant can be reverse-torqued out without damaging the surrounding periodontium and adjacent teeth.
5. Prosthetic components are no longer manufactured for the specific existing implant system.
Clinical Case Scenarios
The following case scenarios, some of which include actual case reports, demonstrate various clinical situations that can guide clinicians to a decision to either save or remove an ailing implant.
When to Save an Ailing Implant
Case Scenario No. 1
Problem: The implant is placed too facial with significant recession on the midfacial aspect of the abutment and/or crown; the implant is healthy and the patient has a high smile line with an intermediate to thick periodontal phenotype (Figure 1 and Figure 2).17-19
Solution: Decoronate the implant by placing a surgical cover screw on it and allow the soft tissues to migrate over the coronal aspect (implant decoronation).8,20,21 A few weeks later, perform the second-stage uncovering of the implant and place a flat profiled healing or custom abutment to redirect the submergence profile or angle of the provisional crown.22 After maturation of the peri-implant mucosal soft tissues several weeks later, make the final impression and construct the definitive restoration with compensatory flat subgingival contours to allow midfacial soft-tissue stability.
Case Scenario No. 2
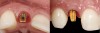
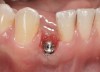
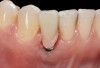
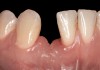
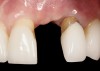
Problem: The implant is placed too facially, and there is significant labial gingival recession, contour change, and mucosal discoloration around the implant, abutment, and crown (Figure 3 and Figure 4). The implant attachment apparatus is intact and healthy, but the patient has a thin periodontal phenotype.
Solution: (1) Decoronate the implant with a sterile cover screw. (2) Place a tooth-supported fixed transitional provisional restoration such as a temporary resin-bonded–retained “Maryland-type” bridge and allow the mucosal tissues to “creep” over the cover screw for a few weeks. (3) Place a subepithelial connective tissue graft to augment the soft tissues both horizontally and vertically. (4) Two months later, perform a second-stage implant uncovering and place a flat-profiled healing abutment. (5) After a few weeks of soft-tissue healing, manage the subgingival restorative contours of the provisional and definitive restoration.
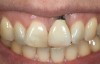
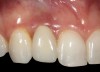
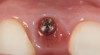
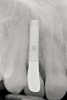
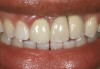
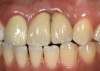
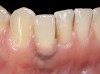
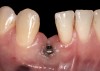
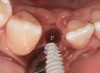
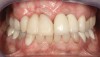
The following case report provides an example of this case scenario: A 28-year-old white female patient presented with her maxillary right lateral incisor significantly longer than the contralateral tooth following restoration of an existing crown that was 10 years old (Figure 3). The patient was dissatisfied with the esthetic appearance of the restoration due to the increased length, recession of the gingival tissues, and discoloration of the surrounding mucosa (Figure 4). Similar to case scenario No. 1, the first step in treatment was to decoronate the healthy implant by placing a flat surgical cover screw and employing a provisional resin-bonded-retained (RBR) prosthesis as a transitional fixed restoration (Figure 5 and Figure 6). The gingival augmentation in situ was allowed to take place for 2 to 3 weeks and was evaluated after that time (Figure 7).
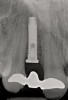
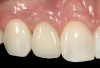
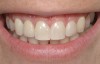
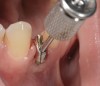
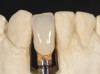
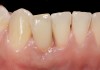
It was determined that additional augmentation was required to increase the soft-tissue volume, so a subepithelial connective tissue graft was acquired from the palate (Figure 8),23,24 placed, and allowed to mature for at least 3 months. Second-stage implant undercovering surgery with a palatal-biased incision was performed after tissue maturation to further thicken the labial soft tissues. In addition, a flat contoured healing abutment was placed to allow the soft tissues to mature without risk of recession, and the RBR replaced (Figure 9). After 4 to 6 weeks of healing, a flat contoured screw-retained provisional restoration was inserted (Figure 10) with the proper submergence profile to restoratively sculpt the soft tissues. An implant-level impression was made and the definitive cement-retained metal-ceramic restoration fabricated and inserted (Figure 11 through Figure 13). The final esthetic outcome to restore the proper length and proportion of the right lateral incisor to match that of the contralateral incisor was accomplished using the treatment steps outlined above, where the mucosal tissues were augmented after implant decoronation (Figure 14).
Case Scenario No. 3
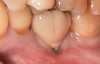
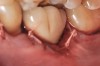
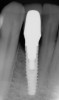
Problem: The implant has bone loss due to peri-implantitis but is not in the esthetic zone and the restoration in place is clinically acceptable. The bone loss has been progressive, and the remaining periodontium is reduced in an area such as a posterior implant (Figure 15 and Figure 16).
Solution: Save the implant by treating the peri-implantitis defect with a surgical therapy protocol, ie, open flap debridement, detoxification, and bone grafting. Show the patient how to clean and maintain the residual tissues.
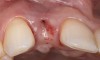
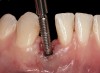
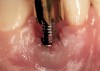
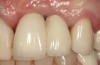
The following case report provides an example of this case scenario: A 55-year-old Caucasian female presented with a chief complaint of tenderness of 1-week duration around a single implant-supported crown in tooth No. 19 position; the implant and restoration had been placed approximately 2 years prior.
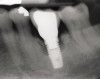
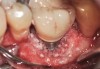
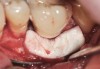
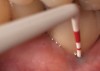
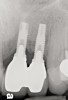
Clinical examination showed 2 mm of buccal recession with a shallow vestibule and absence of keratinized attached gingiva against the crown with 8 mm of circumferential pocketing accompanied by bleeding upon probing (Figure 15 and Figure 16). A periapical radiograph showed a symmetrical vertical osseous defect causing the loss of 50% of the bone around the implant (Figure 17). Because the patient had made a significant investment of time and finances to replace her lost tooth with the implant, she desired that the implant and restoration be retained, if feasible.
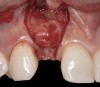
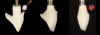
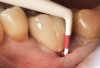
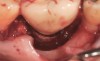
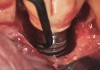
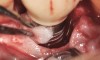
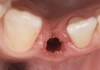
A surgical flap procedure was performed with the intent of thoroughly debriding the granulomatous tissue from the osseous defect (Figure 18 and Figure 19), mechanically and chemically detoxifying the surface of the implant (Figure 20 through Figure 22), and grafting the infrabony component of lesion with bone xenograft (Bio-Oss®, Geistlich Pharma, www.geistlich-na.com) in an attempt to reduce the vertical defect (Figure 23). To concurrently resolve the mucogingival problem, the plan called for placing a dermal allograft (Dermis Allograft, DENTSPLY International, www.dentsply.com) on the buccal (Figure 24) and then replacing the flap (Figure 25).
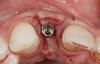
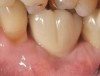
The resolution of the inflammatory aspect of the peri-implantitis lesion (Figure 26) was evidenced by 3-mm pocketing and an absence of bleeding upon probing. A 17-month follow-up (Figure 27) demonstrated resolution of the mucogingival problem, as evidenced by a deepened buccal vestibule, a zone of keratinized gingiva, and correction of the recession. A 17-month post-treatment radiograph (Figure 28) showed bone fill with elimination of the infrabony component of the lesion. Even with the close bone-to-implant approximation evident, a claim of osseous regeneration cannot be validated without histologic verification.
Bone fill around a peri-implantitis–affected implant has become more consistent as the parameters required to achieve a positive result are becoming better defined. Clinical cases must be chosen carefully, because narrow circumferential defects around single implants respond more favorably than wider osseous defects around multiple implants.25 Thorough detoxification of the implant surface is imperative.26 While multiple protocols have been offered for decontaminating an implant surface,27-29 a predictable, low-cost method that is readily available worldwide would be an invaluable asset to a practitioner’s armamentarium. Studies have found sterile saline to be as effective in detoxifying an implant surface as a laser.30,31
This case report supports this finding as meticulous burnishing of the implant surface with a cotton pellet soaked with sterile saline, along with copious irrigation with a 50:50 hydrogen peroxide-to-water solution, seems to have reduced the bacterial concentration on the implant surface to a level that allowed for almost complete radiographic osseous fill of the vertical component of the infrabony defect. Other readily available antiseptics with a high level of cytotoxicity such as sodium hypochlorite and povidone iodine have also been shown to be efficacious in this regard.32
Case Scenario No. 4
Problem: Two adjacent implants are located in the central–lateral incisor positions, and the patient has a high smile line along with loss of inter-implant papilla and midfacial recession around both implants (Figure 29 and Figure 30).33-38
Solution: Decoronate the implants by placing cover screws over both of them. Two weeks later, place connective tissue grafts and/or dermis allograft over the cover screws to augment soft-tissue volume. Repeat the mucosal grafting procedure as needed. Expose one of the implants in a more favorable prosthodontic position, and then create an ovate pontic over the submerged implant with a cantilevered fixed dental prosthesis design (Figure 31).
When to Remove an Ailing Implant
Case Scenario No. 5
Problem: The implant is placed too facial and shallow in depth. The restoration is in the esthetic zone or is cosmetically unacceptable to the patient. Unlike clinical scenario No. 1, there will not be adequate soft-tissue volume after decoronation and/or augmentation to reposition the restoration from a prosthetic standpoint.
Solution: Using a reverse-torque device on high, remove the implant with minimal trauma to the surrounding periodontium. Let the area heal like an extraction socket and place a new implant in the proper position 8 to 10 weeks later. Restore the implant, which will now be in a better restorative and esthetic position, with either a screw- or cement-retained crown.
The rationale for not grafting at the time of implant removal is biologic. Frequently, there is a minimal zone of keratinized attached gingiva around a poorly positioned implant. Allowing the soft tissues to heal and mature in situ (ie, nature’s connective tissue graft) will eliminate the need to coronally reposition the flap, thereby leaving the mucogingival junction in its original position.
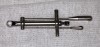
The following case report provides an example of this case scenario: A 24-year-old white male presented with congenitally missing tooth No. 26 restored with a single-tooth cement-retained implant restoration. The implant was placed excessively to the facial aspect of the edentulous site and too shallow, and the periodontal phenotype was thin scalloped (Figure 32). In an effort to mimic the lost midfacial soft tissues, pink ceramics were used as a cosmetic facade. Even though the restoration was not in the esthetic zone, the patient was highly displeased with the esthetic outcome and sought remediation.
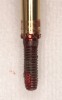
The crown and screw-retained custom abutment were removed, and a surgical cover screw was placed into the implant, thereby allowing spontaneous gingival augmentation in situ (Figure 33 and Figure 34). Note that the lingual aspect of the implant site was significantly more coronal than the labial aspect, which was positive because the defect would be limited to a facial–lingual defect. A fixed RBR bridge was cemented on the adjacent teeth and used as a tooth-supported transitional provisional restoration (Figure 35). A few weeks were allotted to let the soft tissue heal and migrate around the cover screw (Figure 36) to see if there would be complete coverage, thereby allowing a soft-tissue augmentation procedure to be performed with primary flap closure as in clinical scenario No. 2. The major obstacle in achieving a positive tissue response was that the implant depth was also deficient because the implant–abutment connection was at the level of the free gingival margin. It was decided that the best treatment option would be to remove the implant. A high-powered reverse-torque device (Fixture Remover Kit, NeoBiotech, www.neobiotechus.com) was used to remove the implant atraumatically (Figure 38 through Figure 41). The implant socket was allowed to heal for several months not unlike an extracted tooth (Figure 42). A new implant was placed in a better position from both a restorative and esthetic perspective (Figure 43), and after a few months of healing, a new crown was made (Figure 44). A satisfactory functional and esthetic result was achieved (Figure 45 and Figure 46) without employing pink porcelain.
Case Scenario No. 6
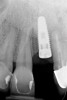
Problem: Implant is placed too close proximally to an adjacent tooth. Forced eruption cannot be performed with the implant in the existing position because the interproximal dimension of the biologic width has been compromised (Figure 47 and Figure 48). Forced eruption without prior implant removal will not gain lost interproximal attachment.9
Solution: (1) Remove the implant and wait for soft-tissue maturation. (2) Perform forced eruption of the tooth with the lost interproximal attachment (ie, papilla) to the level of the adjacent healthy papilla. (3) Rebuild the hard and soft tissues, and replace the implant in the edentulous site. Augmentation can be performed either in conjunction with implant placement or separately based upon the clinician’s judgment and discretion. (4) After healing, provisional and definitive restoration can be managed as per prior clinical scenarios.9
Case Scenario No. 7
Problem: Implants are placed with insufficient inter-implant distance in the esthetic zone with significant bone loss (Figure 49 through Figure 51).
Solution: Remove the ailing implants, and rebuild the hard and soft tissues. Replace with new implants. Surgical correction is inconsistent when trying to reconstruct bone and ideal soft-tissue esthetics on failing implants with attachment loss.
Conclusion
Positive results like the ones achieved in the cases presented offer optimism for the future and the profession at large. While prevention is still the best treatment for peri-implant disease, alternative methods do exist for removing an implant when problems do occur.
Acknowledgement
The authors thank Siyan Lin, DDS, for her contribution to clinical case No. 3 in treatment and documentation.
Disclosure
The authors had no disclosures to report.
About the Authors
Dennis P. Tarnow, DDS
Clinical Professor
Director of Implant Education
Columbia University College of Dental Medicine
New York, New York
Stephen J. Chu, DMD, MSD, CDT
Adjunct Clinical Professor
Department of Prosthodontics
Ashman Department of Periodontology and Implant Dentistry
New York University College of Dentistry
New York, New York
Paul D. Fletcher, DDS
Clinical Associate Professor
Department of Periodontics
Columbia University College of Dental Medicine
New York, New York
Queries to the author regarding this course may be submitted to authorqueries@aegiscomm.com.
References
1. Del Fabbro M, Ceresoli V, Taschieri S, et al. Immediate loading of postextraction implants in the esthetic area: systematic review of the literature. Clin Implant Dent Relat Res. 2015;17(1):52-70.
2. Renvert S, Polyzois I, Claffey N. How do implant surface characteristics influence peri-implant disease? J Clin Periodontol. 2011;38(suppl 11):214-222.
3. Lang NP, Berglundh T. Periimplant diseases: where are we now? – Consensus of the Seventh European Workshop on Periodontology. J Clin Periodontol. 2011;38(suppl 11):178-181.
4. Renvert S, Roos-Jansåker AM, Claffey N. Non-surgical treatment of peri-implant mucositis and peri-implantitis: a literature review. J Clin Periodontol. 2008;35(8 suppl):305-315.
5. Chen ST, Darby IB, Reynolds EC. A prospective clinical study of non-submerged immediate implants: clinical outcomes and esthetic results. Clin Oral Implants Res. 2007;18(5):552-562.
6. Evans CD, Chen ST. Esthetic outcomes of immediate implant placements. Clin Oral Implants Res. 2008;19(1):73-80.
7. Esposito M, Ekestubbe A, Grondahl K. Radiological evaluation of marginal bone loss at tooth surfaces facing single Brånemark implants. Clin Oral Implants Res. 1993;4(3):151-157.
8. Chu SJ, Tarnow DP. Managing esthetic challenges with anterior implants. Part 1: midfacial recession defects from etiology to resolution. Compend Contin Educ Dent. 2013;34 spec no 7:26-31.
9. Chu SJ, Hochman MN, Tarnow DP. Loss of the interdental papilla. Inside Dentistry. 2014;10(1):12-16.
10. Ingber JS, Brown IS. Forced eruption: part I. A method of treating isolated one and two wall infrabony osseous defects—rationale and case report. J Periodontol. 1974;45(4):199-206.
11. Ingber JS, Brown IS. Forced eruption: part II. A method of treating nonrestorable teeth—periodontal and restorative considerations. J Periodontol. 1976;47(4):203-216.
12. Pontoriero R, Celenza F, Ricci G, Carnevale G. Rapid extrusion with fiber resection: a combined orthodontic-periodontic treatment modality. Int J Periodontics Restorative Dent. 1987;7(5):30-43.
13. Ingber JS. Forced eruption: alteration of soft tissue cosmetic deformities. Int J Periodontics Restorative Dent. 1989;9(6):416-425.
14. Salama H, Salama M. The role of orthodontic extrusive remodeling in the enhancement of soft and hard tissue profiles prior to implant placement: a systematic approach to the management of extraction defects. Int J Periodontics Restorative Dent. 1993;13(4):312-333.
15. Amato F, Mirabella AD, Macca U, Tarnow DP. Implant site development by orthodontic forced extraction: a preliminary study. Int J Oral Maxillofac Implants. 2012;27(2):411-420.
16. Coachman C, Salama M, Garber D, et al. Prosthetic gingival reconstruction in a fixed partial restoration. Part 1: introduction to artificial gingiva as an alternative therapy. Int J Periodontics Restorative Dent. 2009;29(5):471-477.
17. Olsson M, Lindhe J. Periodontal characteristics in individuals with varying form of the upper central incisors. J Clin Periodontol. 1991;18(1):78-82.
18. Olsson M, Lindhe J, Marinello CP. On the relationship between crown form and clinical features of the gingiva in adolescents. J Clin Periodontol. 1993;20(8):570-577.
19. Kan JY, Morimoto T, Rungcharassaeng K. Gingival biotype assessment in the esthetic zone: visual versus direct measurement. Int J Periodontics Restorative Dent. 2010;30(3):237-243.
20. Langer B. Spontaneous in situ gingival augmentation. Int J Periodontics Restorative Dent. 1994;14(6):524-535.
21. Salama M, Ishikawa T, Salama H. Advantages of the root submergence technique for pontic site development in esthetic implant therapy. Int J Periodontics Restorative Dent. 2007;27(6):521-527.
22. Zamzok J. Avoiding ridge laps through nonsurgical soft tissue sculpting on implant restorations. J Esthet Dent. 1996;8(5):222-228.
23. Langer B, Calagna L. The subepithelial connective tissue graft. J Prosthet Dent. 1980;44(4):363-367.
24. Langer B, Calagna LJ. The subepithelial connective tissue graft. A new approach to the enhancement of anterior cosmetics. Int J Periodontics Restorative Dent. 1982;2(2):23-33.
25. Schwarz F, Sahm N, Schwarz K, Becker J. Impact of defect configuration on the clinical outcome following surgical regenerative therapy of peri-implantitis. J Clin Periodontol. 2010;37(5):449-455.
26. Heitz-Mayfield LJ, Salvi GE, Mombelli A, et al. Anti-infective surgical therapy of peri-implantitis. A 12-month prospective clinical study. Clin Oral Implants Res. 2012;23(2):205-210.
27. Roos-Jansåker AM, Renvert H, Lindahl C, Renvert S. Surgical treatment of peri-implantitis using a bone substitute with or without a resorbable membrane: a prospective cohort study. J Clin Periodontol. 2007;34(7):625-632.
28. Yamamoto A, Tanabe T. Treatment of peri-implantitis around TiUnite-surface implants using Er:YAG laser microexplosions. Int J Periodontics Restorative Dent. 2013;33(1):21-30.
29. Froum SJ, Froum SH, Rosen PS. Successful management of peri-implantitis with a regenerative approach: a consecutive series of 51 treated implants with 3- to 7.5-year follow-up. Int J Periodontics Restorative Dent. 2012;32(1):11-20.
30. Schwarz F, John G, Mainusch S, et al. Combined surgical therapy of peri-implantitis evaluating two methods of surface debridement and decontamination. A two-year clinical follow up report. J Clin Periodontol. 2012;39(8):789-797.
31. Persson LG, Mouhyi J, Berglundh T, et al. Carbon dioxide laser and hydrogen peroxide conditioning in the treatment of periimplantitis: an experimental study in the dog. Clin Implant Dent Relat Res. 2004;6(4):230-238.
32. Slots J. Low-cost periodontal therapy. Periodontol 2000. 2012;60(1):110-137.
33. Tarnow DP, Magner AW, Fletcher P. The effect of the distance from the contact point to the crest of bone on the presence or absence of the interproximal dental papilla. J Periodontol. 1992;63(12):995-996.
34. Grunder U. Stability of the mucosal topography around single-tooth implants and adjacent teeth: 1-year results. Int J Periodontics Restorative Dent. 2000;20(1):11-17.
35. Tarnow DP, Cho SC, Wallace SS. The effect of inter-implant distance on the height of the inter-implant bone crest. J Periodontol. 2000;71(4):546-549.
36. Prato GP, Rotundo R, Cortellini P, et al. Interdental papilla management: a review and classification of the therapeutic approaches. Int J Periodontics Restorative Dent. 2004;24(3):246-255.
37. Gastaldo, JF, Cury PR, Sendyk WR. Effect of the vertical and horizontal distances between adjacent implants and between a tooth and an implant on the incidence of interproximal papilla. J Periodontol. 2004;75(9):1242-1246.
38. Tarnow DP, Chu SJ. Surgical and prosthetic correction of two adjacent anterior implants: A clinical case report. Clinic Adv Periodontics. 2011;1(3):174-181.